Monday, February 28, 2011

How to Add Drop Shadows Effect to Images

With drop shadows effect to images, our blog images will given a kind of shadow which will surround beside the images. So, the images will look attractive. This effect is active when you put your cursor on the picture, then the picture will expand and there are drop shadows effect. For additional info, drop shadows effect is used CSS (CSS 3), so your blog is not too heavy. Now, if you want to know how to add drop shadows effect to images, just follow the steps below.

1. Log in to your blogger account
2. Go to Design --> Edit HTML
3. Copy the code below, and paste above ]]></b:skin>
.MBT-CSS3 img{
-webkit-transform:scale(0.7); /*Webkit 0.7 times the original Image size*/
-moz-transform:scale(0.7); /*Mozilla 0.7 times the original Image size*/
-o-transform:scale(0.7); /*Opera 0.7 times the original Image size*/
-webkit-transition-duration: 0.5s; /*Webkit: Animation duration*/
-moz-transition-duration: 0.5s; /*Mozilla Animation duration*/
-o-transition-duration: 0.5s; /*Opera Animation duration*/
opacity: 0.5;
margin: 0 10px 5px 0;
}

.MBT-CSS3 img:hover{
-webkit-transform:scale(1.1); /*Webkit: 0.5 times the original Image size*/
-moz-transform:scale(1.1); /*Mozilla 0.5 times the original Image size*/
-o-transform:scale(1.1); /*Opera 0.5 times the original Image size*/
box-shadow:0px 0px 30px gray;
-webkit-box-shadow:0px 0px 30px gray;
-moz-box-shadow:0px 0px 30px gray;
opacity: 1;
}
4. Then, when you will use drop shadow effects to images, use this code
<div class="MBT-CSS3">
<img src="IMAGE URL" />
</div>
=> Change IMAGE URL with your image URL choice
5. Done!

Saturday, February 26, 2011

How to Make Subscription Form

Provide a subscription form is one of the way to increase our blog traffic. Even our visitors can read our blog news without visit our blog directly. So, the presence of subscription form is very important. But, many bloggers can't make a subscription form. So in this post, I will share to you about how to make subscription form. Just follow the steps below. Below is example of the subscription form.


Join the team! By Submitting your email address:


1. Log in to your blogger account
2. Go to Design --> Page Elements --> Add Gadget
3. Choose HTML/Java Script
4. Copy the code below, and paste on it
<a href="http://feeds2.feedburner.com/FullBlogTricks" rel="alternate" title="Subscribe now to avail the unthinkable" type="application/rss+xml"><img border="0" alt="" style=" padding-bottom:20px; margin: 0pt 10px 10px 0pt; float: left; width:100px; height:100px;" src="https://blogger.googleusercontent.com/img/b/R29vZ2xl/AVvXsEhignhyphenhyphenIsPyTan08_UVYdrQXlsyZv5Q5AT1Z1QmLPOfbsQm-zyx6bCzkJjWVAaS3N68RqGzNt8iqA5soPpnQnUq8_WqyfpwdmZ_0EDK1qOP48ZzCL9tJXgqKq4al4lP3neyPY5ditIiVV3X/s400/MBT-RSS-FEED.gif"/></a><p><a href="http://feeds2.feedburner.com/FullBlogTricks" rel="alternate" title="Subscribe to my feed" type="application/rss+xml">Join the team! </a><span style="color: #5C6AA4; font-weight: bold;">By Submitting your email address:</span></p>
<style>
input.mbt1 {
color:#fff;
font: bold 10px Arial, sans-serif;
background:#F39100;
border:0;
padding:3px;
}
input.mbt1hov {
color:#fff;
font: bold 10px Arial, sans-serif;
border:2px solid #F39100;
padding:3px;
}
</style>
<form action="http://feedburner.google.com/fb/a/mailverify" style="padding: 5px; " target="popupwindow" method="post" onsubmit="window.open('http://feedburner.google.com/fb/a/mailverify?uri=FullBlogTricks', 'popupwindow', 'scrollbars=yes,width=550,height=520');return true"><input style=" color:#5C6AA4; background: #fff; border:1px solid #5C6AA4; width: 90px;" name="email" type="text"/><input value="FullBlogTricks" name="uri" type="hidden"/><input value="en_US" name="loc" type="hidden"/> <input onmouseover="this.className='mbt1 mbt1hov'" onmouseout="this.className='mbt1'" value="GO!" class="mbt1" type="submit"/></form><br/>
=> Replace http://feeds2.feedburner.com/FullBlogTricks with your feed URL
=> Replace https://blogger.googleusercontent.com/img/b/R29vZ2xl/AVvXsEhignhyphenhyphenIsPyTan08_UVYdrQXlsyZv5Q5AT1Z1QmLPOfbsQm-zyx6bCzkJjWVAaS3N68RqGzNt8iqA5soPpnQnUq8_WqyfpwdmZ_0EDK1qOP48ZzCL9tJXgqKq4al4lP3neyPY5ditIiVV3X/s400/MBT-RSS-FEED.gif with your picture URL
=> Replace #5C6AA4 with your color code choice
=> Replace Join the team! By Submitting your email address: with your sentences
=> Replace FullBlogTricks with your feedburner feed title

5. Save it now

Friday, February 25, 2011

How to Add Hearts Share Widget

Hi, friends...Now I will post about how to add hearts share widget. Previously, I've posted about How To Add Leaves Fall Share Widget. So, if you've tried How To Add Leaves Fall Share Widget, I'm sure you can add hearts share widget into your blog. Actually, the function is the same, but the difference is in the pictures. If, in the leaves fall share widget, the pictures like leaves. But, in hearts share widget, the pictures like hearts (love). See the example below, and try it into your blog.

1. Log in to your blogger accoount
2. Go to Design --> Edit HTML
3. Check in the "Expand Widget Templates" box
4. Copy the code below, and paste above <data:post.body/>

<div style='clear:both; '>
<div style='width:65px; float:left;'>
<a expr:href='&quot;http://www.stumbleupon.com/submit?url=&quot; + data:post.url + &quot;&amp;title=&quot; + data:post.title' rel='external nofollow' target='_blank'><img alt='Stumble' src='https://blogger.googleusercontent.com/img/b/R29vZ2xl/AVvXsEg1sjbckf36EskX4BUqpjYRIyLfWwoMRbNg8FPL_dqSRluAmJO4YrktghYq5fd1bwTqUGwba3FOrCvvimrE8jFvr2hcHIr4UCB8hxUtccoJoEZJtcwYh0RQ1SURna8SksSgAyuknlYN6Vag/' style='padding:0;margin:0;border:none;'/></a>
</div>
<div style='width:65px; float:left;'>
<a expr:href='&quot;http://del.icio.us/post?url=&quot; + data:post.url + &quot;&amp;title=&quot; + data:post.title' rel='external nofollow' target='_blank'><img alt='Delicious' src='https://blogger.googleusercontent.com/img/b/R29vZ2xl/AVvXsEgZiz8wqjcFg2pH9BMj3ZUaeIKQ1jIokr4tA_-jkjRYYZs4i9ULLssAQwXq5Hs3mYY0A6rXWzHXqWcsyDt05ZG_VWRXFOz8jqshcoa7BwEtocOUoQ1tR-OMOU-WGRZgsmsoPbg1NOO9EL_s/' style='padding:0;margin:0;border:none;'/></a>
</div>
<div style='width:65px; float:left;'>
<a expr:href='&quot;http://technorati.com/faves?add=&quot; + data:post.url' rel='external nofollow' target='_blank'><img alt='Technorati' src='https://blogger.googleusercontent.com/img/b/R29vZ2xl/AVvXsEjfYZqN0cYpXSG1bcmQ6Kk5VHOqbWuOM8ulFKvahUZfYL0CM3LB1mM8-viOpixw35JnAjgsRzqPVfScDgYlcO3gJh9T8DQzopy39EaYx8u1jqBXJA7325vf4ULnWPZoELafnO8lCGuOIIiJ/' style='padding:0;margin:0;border:none;'/></a>
</div>
<div style='width:65px; float:left;'>
<a expr:href='&quot;http://twitthis.com/twit?url=&quot; + data:post.url' rel='external nofollow' target='_blank'><img alt='Twitter' src='https://blogger.googleusercontent.com/img/b/R29vZ2xl/AVvXsEgTdSMR4MgS7lqyp8BfaeZjAoFNd6I-QZmlTErXnOIayLeu0NrtHVPOBwxLUXJeh70wyu2iev_np70pKwsQFzW6yzbyWXx8IoGq1DJKydzyx3k3Uu30rGES8IMa4JKhzBDPCY7wFynh5wJi/' style='padding:0;margin:0;border:none;'/></a>
</div>
<div style='width:65px; float:left;'>
<a expr:href='&quot;http://www.facebook.com/sharer.php?u=&quot; + data:post.url + &quot;&amp;t=&quot; + data:post.title' rel='external nofollow' target='_blank'><img alt='Facebook' src='https://blogger.googleusercontent.com/img/b/R29vZ2xl/AVvXsEiuuwitA1Ldi1D1AkWCLAvVDCgXqEntmJX9p1658gLlVegu1hbs4ufQnzvLFIVMfWWIxBk_EV5GtaoPyfzV4RTesITfJQkXILJvsjog5fvyCQObcE7pNCfmTIFLUJM_vou6Xmzppw2dAP1D/' style='padding:0;margin:0;border:none;'/></a>
</div>
<div style='width:65px; float:left;'>
<a expr:href='&quot;http://myweb2.search.yahoo.com/myresults/bookmarklet?u=&quot; + data:post.url + &quot;&amp;=&quot; + data:post.title' rel='external nofollow' target='_blank'><img alt='Yahoo' src='https://blogger.googleusercontent.com/img/b/R29vZ2xl/AVvXsEiQzoQIbMVRpuYcMUhIykxUZPUzO4HMmSH2guH8DHyZwLYLRq8yq1__ZnA1jo0nmLPGukr_QwUl12ZtVx0SgVPd5P-aOiUBz7aXf27v7-z49Xx7T6Xz-9QXb6f6qVw_9zP3tB5I3Lgq9WMk/' style='padding:0;margin:0;border:none;'/></a>
</div>
<div style='width:65px; float:left;'>
<a expr:href='&quot;http://reddit.com/submit?&amp;url=&quot; + data:post.url + &quot;&amp;title=&quot; + data:post.title' rel='nofollow' target='_blank'><img alt='Reddit' src='https://blogger.googleusercontent.com/img/b/R29vZ2xl/AVvXsEgrnRy5vEfTwYXrx9cmIuQZucUhjut3vTYN8B6TPCx_b_mzDpGs5zuFeaCwHZNaAU0Nk9Ohp8I7kSqgloUCHa8W8Napp7X6QJ_QfHYngCP1Y9N5lrJbklBzxgzxMKa7RYDsJX-OxxkiUHMt/' style='padding:0;margin:0;border:none;'/></a>
</div>
<div style='width:65px; float:left;'>
<a expr:href='data:blog.homepageUrl + &quot;feeds/posts/default&quot;' rel='external nofollow' target='_blank'><img alt='Feed' src='https://blogger.googleusercontent.com/img/b/R29vZ2xl/AVvXsEj7OOhCfDKAq8kjq3oa_YjCwiFUm4jsm7sK8DKMinIyfPC5DveRQJMZ8zzsgELdAaV2Y9GC_LxZb-jZbJJAJjIjU6XPxlbZtc7u9dXJfPkcXieI181wPv0pCL2YHjcVUxMPPt_DR17Opnj0/' style='padding:0;margin:0;border:none;'/></a>
</div>
</div>

=> If you're using "read more", there are 2 <data:post.body/>, choose the second
5. Save it

How to Make Vertical Sliding Menu

Previously, I've posted about How To Make Vertical Navigations Menu With CSS, now I will post about how to make vertical sliding menu. The effect of vertical sliding menu is while we put the cursor over the link in the menu, the link will move to the right. Nice right? To make vertical sliding menu, you just need easy steps. Follow the easy steps below.

1. Log in to your blogger account
2. Go to Design --> Edit HTML
3. Copy the code below, and paste above </head>
<script src='http://ajax.googleapis.com/ajax/libs/jquery/1.3.2/jquery.min.js' type='text/javascript'/>

<script type='text/javascript'>
//<![CDATA[

$(document).ready(function()
{
slide("#sliding-navigation", 25, 15, 150, .8);
});

function slide(navigation_id, pad_out, pad_in, time, multiplier)
{
// creates the target paths
var list_elements = navigation_id + " li.sliding-element";
var link_elements = list_elements + " a";

// initiates the timer used for the sliding animation
var timer = 0;

// creates the slide animation for all list elements
$(list_elements).each(function(i)
{
// margin left = - ([width of element] + [total vertical padding of element])
$(this).css("margin-left","-180px");
// updates timer
timer = (timer*multiplier + time);
$(this).animate({ marginLeft: "0" }, timer);
$(this).animate({ marginLeft: "15px" }, timer);
$(this).animate({ marginLeft: "0" }, timer);
});

// creates the hover-slide effect for all link elements
$(link_elements).each(function(i)
{
$(this).hover(
function()
{
$(this).animate({ paddingLeft: pad_out }, 150);
},
function()
{
$(this).animate({ paddingLeft: pad_in }, 150);
});
});
}

//]]>
</script>
4. Then, save it
5. For the links, you can add into Page Elements --> Add Gadget, or everywhere.
<ul id="sliding-navigation">

<li class="sliding-element"><a href="#">Link 1</a></li>

<li class="sliding-element"><a href="#">Link 2</a></li>

<li class="sliding-element"><a href="#">Link 3</a></li>

<li class="sliding-element"><a href="#">Link 4</a></li>

<li class="sliding-element"><a href="#">Link 5</a></li>

</ul>
=> The anchor text URL
=> The anchor text name

OK, that's all, friends...

Thursday, February 24, 2011

How to Add Icon Beside Labels

Now, I will post about how to add icon beside labels. For example, you can look at Full Blog Tricks labels. Shortly, if you want to add icon beside labels, you can follow the steps below.

1. Log in to your blogger account
2. Go to Design --> Edit HTML
3. Find this code : .
.sidebar ul li {
4. Then add the code below, under .sidebar ul li {
background:transparent url(https://blogger.googleusercontent.com/img/b/R29vZ2xl/AVvXsEg7xjHOOb53FCaTyNjHmV3OczNjvcgNGFy5l17G3M7qcbVNo9VC8p8Kbv97MTD5DdrDaIVzOGksy4eA1NYHzdsyC-KGhRG8mKC4NpgKzElEKWZdeOeTswDDzA_FAZE77SGy287dmyj-Gbw/s1600/sidebarli.jpg) no-repeat scroll left center;
=> You can change the image URL, with your choice
5. Save now.

Monday, February 21, 2011

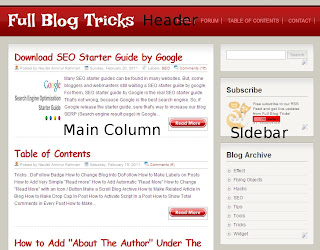
How to Find Header, Sidebar, and Main Column Width

Usually, we want to change our blog header, sidebar, and main column width. Because maybe we feel our blog sidebar is too wide, but many bloggers don't know where the place to change it. So, in this trick, I will share to you how to find header, sidebar, and main column width. You can find header, sidebar, and main column width with this code : (Each template has different code, but you can find with red code)

For Header
#header-wrapper {
height:130px;
margin:0 auto;
position:relative;
width:979px;
}

For Main Column
#main-wrapper {
background:white
border:1px solid #AEAEAE;
float:left;
margin-right:20px;
padding:20px;
width:617px;
}

For Sidebar
#sidebar-wrapper {
float:left;
overflow:hidden;
width:300px;
}

Then? For next step, it's up to you. You can change the width or add some pictures.

Sunday, February 20, 2011

Download SEO Starter Guide by Google

Many SEO starter guides can be found in many websites. But, some bloggers and webmasters still waiting a SEO starter guide by google. For them, SEO starter guide by Google is the real SEO starter guide. That's not wrong, because Google is the best search engine. So, if Google release the starter guide, sure that's way to increase our blog SERP (Search engine result page) in Google with legal. So, if you want to download SEO starter guide by google, you can download in this link :

Download SEO Starter Guide by Google 

Hopefully useful... ^_^

Friday, February 18, 2011

How to Add "About The Author" Under The Posts

About the author is a widget to show about the author profile. For the details, you can show the image below.
Now, if you want to add about the author under the posts, you can follow the steps below.

1. Log in to your blogger account
2. Go to Design --> Edit HTML
3. Check in the Expand Widget Templates box
4. Copy the code below, and paste above ]]></b:skin>
.authbio{
color: #555;
font-weight: normal;
font-size:0.9em;
background: #fff;
border: 3px groove #ccc;
width: 475px;
padding: 10px;
margin-bottom:20px;
-moz-border-radius:15px;
-webkit-border-radius:15px;
}

.authbio a{

text-decoration:underline;

}
img.alignleft {
float:left;
background-color: #c4e3e0;
border:5px solid #c4e3e0;
padding: 5px;

margin-left:5px;
margin-top:0px;
margin-bottom:25px;
margin-right:12px;

}
=> You can change the width of "About the Author"
5. After that, add the code below under <data:post.body/>
<div class='authbio'>
<div style='float: left;'>
<img alt='The author of Full Blog Tricks' src='http://i622.photobucket.com/albums/tt309/kokobota/kokogif.gif'/></div>
<h2><strong>About The Author:</strong></h2>
Naufal Aminur Rahman: I am just a simple blogger. I hope, Full Blog Tricks can helps many people or bloggers to modify their blog easily. If you like this blog, you can follow my blog. Thank for my loyal readers.</div>
=> You can change the text that you want to display
=> You can change the profile picture
6. Save it now!

Thursday, February 17, 2011

How To Add Leaves Fall Share Widget

If, previously I have posted about how to add sexy share widget, now I will post about how to add leaves fall share widget. Actually the function is same as another share widget, but the difference is the style. The style is like leaves fall. So, I call leaves fall share widget. This widget contain 8 social bookmark button such as facebook, twitter, digg, technorati, etc. You can see the image of leaves fall share widget below.
Now, if you want to add leaves fall share widget into your blog, just follow the easy steps below.
1. Log in to your blogger account
2. Go to Design --> Edit HTML
3. Check in the Expand Widget Templates box
4. Copy the code below, and paste under <data:post.body/> (If you're using "Read More", there are 2 <data:post.body/> , then choose the first)
<div style='clear:both; '>
<div style='width:65px; float:left;'>
<a expr:href='&quot;http://www.stumbleupon.com/submit?url=&quot; + data:post.url + &quot;&amp;title=&quot; + data:post.title' rel='external nofollow' target='_blank'><img alt='Stumble' src='https://blogger.googleusercontent.com/img/b/R29vZ2xl/AVvXsEhWVEWsw0Y19dzb3wYRv3JKdHIfYlOxqmTd8JNQDmzhIJOlQrXZPLhubX5bbYPHOuboooiDLCwCESINEshCXOeHUYs7ERg1AGZebNBdk5LQykh2rBZ-sSwdGf4E11olZcYNOwZ9ZtjDS3bF/' style='padding:0;margin:0;border:none;'/></a>
</div>
<div style='width:65px; float:left;'>
<a expr:href='&quot;http://del.icio.us/post?url=&quot; + data:post.url + &quot;&amp;title=&quot; + data:post.title' rel='external nofollow' target='_blank'><img alt='Delicious' src='https://blogger.googleusercontent.com/img/b/R29vZ2xl/AVvXsEjQ6oGJ0GafskRyD14dPAitktDT-k1MF6p7mvthwxisYp9frxjQx9KFNvWKjGGoynO90RKTKDXEcHLO7ry-noJgkUOEZtVh_oTn10WeLSALE6nBinjnI8nqbAhBX8monkbUgKLWl1UXJqSd/' style='padding:0;margin:0;border:none;'/></a>
</div>
<div style='width:65px; float:left;'>
<a expr:href='&quot;http://technorati.com/faves?add=&quot; + data:post.url' rel='external nofollow' target='_blank'><img alt='Technorati' src='https://blogger.googleusercontent.com/img/b/R29vZ2xl/AVvXsEgY6JFdBGBnFYh2GcHgLZQWI_AKoxnZJjobeBNLpdixf3K5HJ9DdaV7Q3_3WIKGOUQvEfde2HzJpJ0Ng9QbMPlfGn9ZsphEGFcwd2529uUMlAbOyQxZW6IOMlTN-Lhx0Gzwpw2FXGwcuCi1/' style='padding:0;margin:0;border:none;'/></a>
</div>
<div style='width:65px; float:left;'>
<a expr:href='&quot;http://twitthis.com/twit?url=&quot; + data:post.url' rel='external nofollow' target='_blank'><img alt='Twitter' src='https://blogger.googleusercontent.com/img/b/R29vZ2xl/AVvXsEg84bHokw0KkoWHGrD1bxM9GGPY3-serAaHcarSp-vYxTS81UO5rNgGXMfqZ6zevghVNJ6t5i4Udywn-xere_H35E7viGMLB9y6FPtecjX7qb2PDYhT6DmaKKf1h6guDAejVf2QR4N1ulfz/' style='padding:0;margin:0;border:none;'/></a>
</div>
<div style='width:65px; float:left;'>
<a expr:href='&quot;http://digg.com/submit?phase=2&amp;url=&quot; + data:post.url + &quot;&amp;title=&quot; + data:post.title' rel='nofollow' target='_blank'><img alt='Digg' src='https://blogger.googleusercontent.com/img/b/R29vZ2xl/AVvXsEjtplPqhKfN_D90xLrDTO8wBgFR0XqjimQqj7lcP2QaIccqveVfFeDz0qkh72hlOaX4cvWv5mUsTcgB2QsrxYYTaEzfl6JPNS1g8XunoZb-ZZwEf5u7FZjTgS3q_27ruK-kEkAp6QHOn7mo/' style='padding:0;margin:0;border:none;'/></a>
</div>
<div style='width:65px; float:left;'>
<a expr:href='&quot;http://www.facebook.com/sharer.php?u=&quot; + data:post.url + &quot;&amp;t=&quot; + data:post.title' rel='external nofollow' target='_blank'><img alt='Facebook' src='https://blogger.googleusercontent.com/img/b/R29vZ2xl/AVvXsEi7QzRn4F493uscUG-aHr4ssU6ZtCZAWZBIFWRdpuU4Vdf3hfIQA7TpNbvBrYQhoHG9-FkXH5d4cGiY1v1uWvTct1EXg-L_5mZgl1EXXQODvz2W7ZcbM4sPp0vr851zrlcz7Z_nfbYT1cMI/' style='padding:0;margin:0;border:none;'/></a>
</div>
<div style='width:65px; float:left;'>
<a expr:href='&quot;http://reddit.com/submit?&amp;url=&quot; + data:post.url + &quot;&amp;title=&quot; + data:post.title' rel='nofollow' target='_blank'><img alt='Reddit' src='https://blogger.googleusercontent.com/img/b/R29vZ2xl/AVvXsEhsqwr5QsPyme7v97ZfmPgqWq9wb4Cy3_EOWTMRbjGfmFTYSVEHU_Pelb0zeCZYoP9f4_Zh91GKoaLSS0VTH4n6y1Qq1Vrg5AEgmZSG9TECG4JM7st74MSRcLGBUM8JHSHPbmbcsxsy7fXh/' style='padding:0;margin:0;border:none;'/></a>
</div>
<div style='width:65px; float:left;'>
<a expr:href='data:blog.homepageUrl + &quot;feeds/posts/default&quot;' rel='external nofollow' target='_blank'><img alt='Feed' src='https://blogger.googleusercontent.com/img/b/R29vZ2xl/AVvXsEgMO5joWG6adBfkWOuDSnIdWRXN1hvvFDv4AW14mKfs-F8cmxeIel5izHOiYZbNa9MZW5sefQzgnxfzXCk9eE9wkzPzESAsk-ssgmLHw4vCIVRBQg-aJr2gyX3WK8BWJAN5P5RZhw85oIDW/' style='padding:0;margin:0;border:none;'/></a>
</div>
</div>
5. Then save it now! Easy right?

Monday, February 14, 2011

How To Add Breadcrumb Navigation

Breadcrumb navigation is a form of navigation to our blog content, so breadcrumb navigation can help visitors more easily to browse the blog content. Usually breadcrumb navigation looks like this:

Browse >> Home >> Tricks >> How To Add Breadcrumb Navigation

Many webmasters said, you should add breadcrumb navigation into your blog, beside can help your visitors, Google likes blog that added breadcrumb navigation. So, why don't you start thinking to add bredcrumb navigation into your blog now??? If you want to add breadcrumb navigation, you can follow the steps below.

1. Log in to your blogger account
2. Go to Design --> Edit HTML
3. Check in the Expand Widget Templates box
4. Copy the code below, and paste above ]]></b:skin>
.breadcrumbs{padding:5px 5px 5px 0;margin:0;font-size:95%;line-height:1.4em;border-bottom:4px double #cadaef;}
=> You can change the color code here
5. Then, find <div class='post hentry uncustomized-post-template'> . Copy the code below.
<b:if cond='data:blog.homepageUrl == data:blog.url'>
<b:else/>
<b:if cond='data:blog.pageType == &quot;item&quot;'>
<div class='breadcrumbs'>
Browse &#187; <a expr:href='data:blog.homepageUrl'>Home</a> &#187;
<b:if cond='data:post.labels'><b:loop values='data:post.labels' var='label'>
<a expr:href='data:label.url' rel='tag'><data:label.name/></a>
<b:if cond='data:label.isLast != &quot;true&quot;'> , </b:if>
</b:loop>
</b:if> &#187; <data:post.title/>
</div>
</b:if>
</b:if>
=> You can change the words
after that, paste above <div class='post hentry uncustomized-post-template'> .
7. Done? Save it now!

How To Add Text Resizer In Blog

In this post, I will share to you about how to add text resizer in blog. The function of text resizer is to change the font size of the posts to be larger or smaller by click on the text resizer icon. If you want to add text resizer for your blog, you can follow the steps below.

1. Log in to your blogger account
2. Go to Design --> Edit HTML
3. Check in the Expand Widget Templates box
4. Copy the code below, and paste above ]]></b:skin>
.textsizernorm, .textsizerbig, .textsizerbigger, .textsizersmall {
padding-top: 20px;
-o-transition: font 2s ease-in;
-moz-transition: font 2s ease-in;
-webkit-transition: font 2s ease-in;
}
.textsizersmall{font-size:12px}
.textsizernorm{font-size:13px}
.textsizerbig{font-size:14px}
.textsizerbigger{font-size:15px; font-weight:bold}
span.sizer {
float: right;
text-align: center;
height: 20px;
width: 250px;
margin: 0 10px 10px 0;
background: #333366;
display: block;
font-size: 18px;
padding: 2px 10px;
color: #00CCFF;
text-shadow: 1px 1px 1px blue;
cursor: pointer;
border: 1px solid #eee;
font-family: Times New Roman;
border-radius: 5px;
-moz-border-radius: 5px;
-webkit-border-radius: 5px;
box-shadow: 1px 1px 6px #000;
-moz-box-shadow: 1px 1px 6px #000;
-webkit-box-shadow: 1px 1px 6px #000;display: block;
}
span.sizer:active {
border: 1px solid #555;
border-radius: 8px;
-moz-border-radius: 8px;
-webkit-border-radius: 8px;
background: #003399;
box-shadow:0px 0px 12px #000;
-moz-box-shadow:0px 0px 12px #000;
-webkit-box-shadow:0px 0px 12px #000;
margin-top: -1px;
}
.clr20 {clear: both; height: 20px;}
=> You can change the font size and font style
5. Then, find <data:post.body/> , after that add the code below, so the result will like this (the blue code are the code that you have to add)
<div class='textsizersmall' onclick='if (this.className==&quot;textsizersmall&quot;) { this.className=&quot;textsizernorm&quot; } else if (this.className==&quot;textsizernorm&quot;) { this.className=&quot;textsizerbig&quot; } else if (this.className==&quot;textsizerbig&quot;) { this.className=&quot;textsizerbigger&quot; } else if (this.className==&quot;textsizerbigger&quot;) { this.className=&quot;textsizersmall&quot; } else { this.className=&quot;textsizersnall&quot; }'><span class='sizer'>Text Resizer: Click for Resizer</span>
<div class="clr20"/>

<data:post.body/>

</div>
6. Now, you can save your work.

Saturday, February 12, 2011

Kinds Of Text Area

Text area is a multi-line text input control. Text area formed by <textarea> tag. The function of text area is to give a frame for special words. But, there are many blogger/webmaster using text area for script box. There are many text area, so now I will give you example the kinds of text area.

Standard Text Area

<textarea>Full Blog Tricks</textarea>

Text Area that can set the widht and height

<textarea cols="20" rows="5">Full Blog Tricks</textarea>

Text Area with password style


<input type="password" value="Full Blog Tricks" />

Text Area with dashed line

<textarea cols="20" rows="5" style="border: 2px dashed ;">Full Blog Tricks</textarea>

Text Area with one click select all

<textarea cols="20" onclick="this.focus(); this.select();" rows="5">Full Blog Tricks</textarea>

Text Area with select all by mouse over (no click)

<div>
<form name="catatancuss">
<div align="left" style="margin-bottom: 0pt; margin-top: 0pt;">
<textarea ;="" cols="55" name="txt" onmouseover="this.form.txt.select()" readonly="readonly" rows="100" style="height: 85px; width: 185px;">Full Blog Tricks</textarea></div>
</form>
</div>

Text Area with Select All button
<div>
<form name="copy">
<div align="center">
<input onclick="javascript:this.form.txt.focus();this.form.txt.select();" type="button" value="Select All" /> </div>
<div align="center">
</div>
<div align="center">
<textarea cols="55" name="txt" rows="100" style="height: 85px; width: 185px;" wrap="VIRTUAL">Full Blog Tricks</textarea></div>
</form>
</div>

Colorful Text Area

<textarea cols="20" name="code" rows="3" style="-moz-border-radius: 10px; background: #BFFAFF; border-bottom: 4px solid #40FF1F; border-left: 4px solid #FFE900; border-right: 4px solid #40FF1F; border-top: 4px solid #FFE900; color: red; line-height: 1.5em; padding: 5px;">Full Blog Tricks</textarea>


<textarea name="code" rows="3" cols="20" style="background: #FFDAAF; color: #7F4500; border: 2px ridge #7F4500; line-height: 1.5em; padding: 5px; -moz-border-radius-topleft: 15px; -moz-border-radius-bottomright: 15px;">Full Blog Tricks</textarea>


<textarea name="code" rows="3" cols="20" style="background:#FF000A; color:#fff; border:3px double #ffaf; line-height:1.5em; padding:5px;">Full Blog Tricks</textarea>


<textarea name="code" rows="3" cols="20" style="background: #EF0090; color: #FFEFF9; border: 3px dotted #FFEFF9; line-height: 1.5em; padding: 5px;">Full Blog Tricks</textarea>


<textarea name="code" rows="3" cols="20" style="background: #FBEFFF; color: #CA3DD9; border: 1px solid #CA3DD9; border-left: 20px solid #CA3DD9; line-height: 1.5em; padding: 5px; -moz-border-radius: 7px;">Full Blog Tricks</textarea>

You can use text area for your post or your widgets Hopefully useful... ^_^

Friday, February 11, 2011

Submit To 1000+ Search Engines

Submit to many search engines can increase our blog traffic. Because our blog will be known by many search engines. And, do you know? About 60% our blog traffic, usually came from search engines. So, why we don't use search engine to get more traffic easily? Special for Full Blog Tricks readers, I will give you list of websites for search engine submission.

1. www.searchengineoptimising.com (submit to 40 search engines)
2. www.submitexpress.com (submit to 40 search engines)
3. www.official.my (submit to 300 search engines)
4. www.submit-away.com (submit to 600 search engines)
5. www.submitshop.com ( submit to 100 search engines)

Hopefully useful...

Thursday, February 10, 2011

How To Add Meta Tags

Meta tags are method to give some informations about a page, website, or blog. There are many meta tags that appropriate with standard of HTML 4.0 from W3C (World Wide Web Consortion), but actually that really used by search engine only 3 meta tags, that are description, keyword, dan robots. For the details, you can read the explanations of meta tags below.

Meta Description Tag
Meta Description Tag is used to gives a general overview about the contents of your webpages. The standard is about 150 characters. And try to this description can be sentences which were located at the beginning of your web page or blog. The example of meta description tag :

<meta name="description" content="Full Blog Tricks provides many blogger tricks, blogger hacks, blogger widgtets, and SEO tips."/>

If you don't use Meta Description Tag, some search engine like Google and Nothern Light usually use sentences which were located at the beginning of your web page or blog as a Meta Description Tag. And, if the earliest part of your blog is a menu, so the Meta Description Tag that will be display is like this:

Home | Article Request | About Me | Contact ... Full Blog Tricks provides many blogger tricks, blogger hacks, blogger widgtets, and SEO tips.

Meta Keywords Tag
Meta Keywords Tag is very important, because that's determining what keywords that can find a web page on search engines. Usually, the form of meta keywords tag is like this

<meta name="keywords" content="keyword1, keyword2, keyword3, ... " />

But there is wrote without comma like this

<meta name="keywords" content="keyword1 keyword2 keyword3 ..." />

Actually, the function is same. The purpose of comma just so the keywords are more readable. The important thing is don't repeat your keywods more than 3 times, because search engines will assume as spamming. And, you must not insert some keywords that unrelated with your blog. For example, your blog is about "blogger tricks" , so don't use "music" for your blog keywords.

Meta Robots Tag
The purpose of use meta robots tag is determining which pages can be index by spider and which page are not. The basic format of meta robots tag is

<meta name="robots" content="(index/noindex), (follow/nofollow)" />

If you want to spider index your home page and browse your links in your blog, you can use this command

<meta name="robots" content="index,  follow"/>

If you don't want spider browse your blog, you can use the command below

<meta name="robots" content="noindex,  nofollow"/>

So, how to add meta tags in blogger templates?

1. Log in to your blogger account
2. Go to Design --> Edit HTML
3. Find <title><data:blog.pageTitle/></title> or <head>
4. Paste the meta tags under <title><data:blog.pageTitle/></title>
<meta content='your description' name='description'/>
<meta content='keyword1, keyword2, keyword3, ...' name='keywords'/>
<meta content='index, follow' name='robots'/>
For example
<meta content='Full Blog Tricks provides many blogger tricks, blogger hacks, blogger widgtets, and SEO tips. ' name='description'/>
<meta content='blogger tricks, blogger hacks, SEO tips' name='keywords'/>
<meta content='noindex, nofollow' name='robots'/>
5. Save it, good luck!

Saturday, February 5, 2011

Hidden Keyword Phrase Method

Hidden keyword are injecting keyword phrase into a template that unbeknown by the visitors or readers, but Search Engine will still can detected it. By using hidden keyword phrase method, your blog will has strong keyword, and maybe your blog will be the first in search engine. Just follow the steps below.

1. Log in to your blogger account
2. Go to Design --> Edit HTML , don't forget to backup your template first!
3. Copy the code below, and paste above ]]></b:skin>
#hidden-keyword {
float: left;
margin: -4500px;
padding: -3000px;
}

<div id="hidden-keyword">
<h1>
<a href="BLOG URL" title="BLOG KEYWORD">BLOG KEYWORD</a>
</h1>
</div>
=> Adjust the margin and padding with your blog template. You must see the preview, Are the keyword phrase still visible or not. If still visible, try to change the margin and padding without delete the sign (-)
For example :
#hidden-keyword {
float: left;
margin: -3000px;
padding: -2500px;
}

<div id="hidden-keyword">
<h1>
<a href="http://full-tricks.blogspot.com/" title="blogger tricks, blogger hacks, SEO tips">blogger tricks, blogger hacks, SEO tips</a>
</h1>
</div>
4. If the setting have finished, save your template now!

Off-Page Hidden Keyword Method

In this method, we will try to steal chance from habit of banner exchange which usually becomes habit of bloggers. As we know, banner / link exchange can increase our blog PageRank. So, if we want to increase our blog PageRank, this trick can be a good SEO weapon for our blog. Google

For banner design, I think that's same. Regardless the size of banner, animation or only a image, all the same in the eyes of Google. Google doesn't care about good or not our banner design, Google just read the HTML Script from our banner. Here the SEO strategy is running. Look at the script below!
<!-- Banner -->
<a href=BLOG URL><img border="0" alt ="BLOG KEYWORD" src="IMAGE URL"/></a>
<noscript><a href="BLOG URL" title="BLOG KEYWORD"><b>BLOG KEYWORD</b></a></noscript>
<!-- End Banner -->
For example :
<!-- Banner -->
<a href="http://full-tricks.blogspot.com"><img border="0" alt ="blogger tricks, blogger hacks, SEO tips" src="http://robots1996.fileave.com/besar.jpg"/></a>
<noscript><a href="http://full-tricks.blogspot.com" title="blogger tricks, blogger hacks, SEO tips"><b>blogger tricks, blogger hacks, SEO tips</b></a></noscript>
<!-- End Banner -->
In that script, we are using <noscript> tag, so that script can't see by internet users. From here, we can add some keywords from our blog. Spread the banner to your friend's blog, so your friends can put it on their blog. Hopefully Useful! ^_^

Friday, February 4, 2011

How To Make Headline News In Blog

As we know, headline news is a feature in TV stations wich usually located at the bottom. Usually, that's display some latest news. But in this case, because it's about blog, so the headline news display the recent posts of your blog. So, the visitors can watch the newest post of your blog. Now, if you want to add it into your blog, just follow the steps below.

1. Log in to your blogger account
2. Go to Design --> Page Elements --> Add Gadget
3. Choose HTML/Java Script
4. Copy the code below, and paste into the place
<script type="text/javascript">
var hn_url_blog = "http://full-tricks.blogspot.com";
var hn_jumlah_post = 5;
var hn_warna_latar = "#EEEEEE";
var hn_warna_garis = "#000000";
var hn_posisi = "top";
var hn_tampilkan_judul = true;
var hn_backlink = true;
</script>
<script src=" https://sites.google.com/site/fullblogtricks/javascript-sama-edit-html/headlinenews.js?attredirects=0&d=1 ">
</script>
=>Change with your blog address
=>Number of posts that you want to display
5. Save now

How To Make Blog Archive Widget With New Updates

If  previously I've posted about Make Scroll Blog Archive, now I will post the updates. Blog archive in our blog is very important, because when visitors are exploring our blog, then this blog archive must be present to our blog visitors to facilitate the visitors explore our blog. Well, in this time I will share you how to make blog archive widget with new updates. Just follow the steps below.

1. Log in to your blogger account
2. Go to Design --> Page Elements --> Add Gadget
3. Choose HTML/Java Script
4. Copy the code below and paste into the box
<script style="text/javascript" src="http://robots1996.fileave.com/blog%20archive.js"></script>
<script src="http://full-tricks.blogspot.com/feeds/posts/default?max-results=9999&amp;alt=json-in-script&amp;callback=loadtoc"></script>
=>Change full-tricks.blogspot.com with your blog address.
5. Done? Save it now!

Wednesday, February 2, 2011

How To Make Related Article In Blog

One way to increase AlexaRank is to make related article in our blog. So, our blog visitors can read another article in our blog and increase our blog's pageviews. This trick also has proven can increase traffic and maybe PageRank. Besides that, the visitors will stay longer in our blog, because they want to read another article. Now, to make related article in blog, you have to follow the steps below.

1. Log in to your blogger account
2. Go to Design --> Edit HTML
3. Then, check in the Expand Widget Templates box
4. Find this code : ]]></b:skin>  and add the code below, above ]]></b:skin>
.rbbox{border: 1px solid rgb(192, 192, 192);padding: 5px;
background-color: #f0f0f0;-moz-border-radius:5px; margin:5px;}
.rbbox:hover{background-color: rgb(255, 255, 255);}
5. After that, find this code : <data:post.body/>
    => If you are using "Read More", there are 2 <data:post.body/>, choose the first.
6. Then, add the code below , and put under <data:post.body/>
<b:if cond='data:blog.pageType == &quot;item&quot;'>
<br/>
<br/>
<H2>Related Articles:</H2>
<div class='rbbox'>
<div style='margin:0; padding:10px;height:200px;overflow:auto;border:1px solid #ccc;'>
<div id='albri'/>
<script type='text/javascript'>
var homeUrl3 = &quot;<data:blog.homepageUrl/>&quot;;
var maxNumberOfPostsPerLabel = 4;
var maxNumberOfLabels = 10;
maxNumberOfPostsPerLabel = 10;
maxNumberOfLabels = 3;
function listEntries10(json) {
var ul = document.createElement(&#39;ul&#39;);
var maxPosts = (json.feed.entry.length &lt;= maxNumberOfPostsPerLabel) ?
json.feed.entry.length : maxNumberOfPostsPerLabel;
for (var i = 0; i &lt; maxPosts; i++) {
var entry = json.feed.entry[i];
var alturl;
for (var k = 0; k &lt; entry.link.length; k++) {
if (entry.link[k].rel == &#39;alternate&#39;) {
alturl = entry.link[k].href;
break;
}
}
var li = document.createElement(&#39;li&#39;);
var a = document.createElement(&#39;a&#39;);
a.href = alturl;
if(a.href!=location.href) {
var txt = document.createTextNode(entry.title.$t);
a.appendChild(txt);
li.appendChild(a);
ul.appendChild(li);
}
}
for (var l = 0; l &lt; json.feed.link.length; l++) {
if (json.feed.link[l].rel == &#39;alternate&#39;) {
var raw = json.feed.link[l].href;
var label = raw.substr(homeUrl3.length+13);
var k;
for (k=0; k&lt;20; k++) label = label.replace(&quot;%20&quot;, &quot; &quot;);
var txt = document.createTextNode(label);
var h = document.createElement(&#39;b&#39;);
h.appendChild(txt);
var div1 = document.createElement(&#39;div&#39;);
div1.appendChild(h);
div1.appendChild(ul);
document.getElementById(&#39;albri&#39;).appendChild(div1);
}
}
}
function search10(query, label) {
var script = document.createElement(&#39;script&#39;);
script.setAttribute(&#39;src&#39;, query + &#39;feeds/posts/default/-/&#39;
+ label +
&#39;?alt=json-in-script&amp;callback=listEntries10&#39;);
script.setAttribute(&#39;type&#39;, &#39;text/javascript&#39;);
document.documentElement.firstChild.appendChild(script);
}
var labelArray = new Array();
var numLabel = 0;
<b:loop values='data:posts' var='post'>
<b:loop values='data:post.labels' var='label'>
textLabel = &quot;<data:label.name/>&quot;;
var test = 0;
for (var i = 0; i &lt; labelArray.length; i++)
if (labelArray[i] == textLabel) test = 1;
if (test == 0) {
labelArray.push(textLabel);
var maxLabels = (labelArray.length &lt;= maxNumberOfLabels) ?
labelArray.length : maxNumberOfLabels;
if (numLabel &lt; maxLabels) {
search10(homeUrl3, textLabel);
numLabel++;
}
}
</b:loop>
</b:loop>
</script>
</div>
<script type="text/javascript">RelPost();</script>
</div>
</b:if>
7. Save it now!