Thursday, March 31, 2011

Top 5 Paid to Review Websites

Do you know, what is Paid to Review (PTR). PTR is a kind of making money online. The rule is very easy, you only write an article based on the advertiser order, then the advertiser will measure your article and you will get money. Easy right? So, I think, Paid to Review is the best way to make money online. How not? Only by wrote on our blog that based advertisers order, we can get $5-$500 per post!

Usually PTR websites use PayPal. Why? Because, you can transfer your money to local bank easily. Actually, there are many PTR websites with different fee. So, I will share to you about, top 5 paid to review websites.

  • www.reviewme.com
  • www.blogsvertise.com
  • www.sponsoredreviews.com
  • www.buyblogreviews.com
  • www.lodlaunch.com

OK, that' all friends! Just grab your keyboard and earn much money!

Saturday, March 26, 2011

How to Add Contents Slider

Usually, on some templates we found a contents slider. Sure, that widget contains some blog posts that added some jQuery. Many bloggers said, that contents slider caused blog to be heavy. But, some bloggers also said the contents slider makes blog become beautiful and elegant. So, it's up to you to try contents slider or not. Now, if you want to know how to add contents slider for your blog, just follow the steps below. See the demo HERE.

1. Log in to your blogger account
2. Go to Design --> Edit HTML
3. Copy the jQuery below, and paste above </head>
<script type="text/javascript" src="http://ajax.googleapis.com/ajax/libs/jquery/1.3.2/jquery.min.js" ></script>
<script type="text/javascript" src="http://ajax.googleapis.com/ajax/libs/jqueryui/1.5.3/jquery-ui.min.js" ></script>
<script>$(document).ready(function(){
        $("#featured > ul").tabs({fx:{opacity: "toggle"}}).tabs("rotate", 5000, true);
    });</script>
4. Then add the CSS code below, and paste above ]]></b:skin>
#featured{
    width:400px;
    padding-right:250px;
    position:relative;
    height:250px;
    background:#fff;
    border:5px solid #ccc;
}
#featured ul.ui-tabs-nav{
    position:absolute;
    top:0; left:400px;
    list-style:none;
    padding:0; margin:0;
    width:250px;
}
#featured ul.ui-tabs-nav li{
    padding:1px 0; padding-left:13px;
    font-size:12px;
    color:#666;
}
#featured ul.ui-tabs-nav li span{
    font-size:11px; font-family:Verdana;
    line-height:18px;
}
#featured .ui-tabs-panel{
    width:400px; height:250px;
    background:#999; position:relative;
        overflow:hidden;
}
#featured .ui-tabs-hide{
    display:none;
}
#featured li.ui-tabs-nav-item a{/*On Hover Style*/
    display:block;
    height:60px;
    color:#333;  background:#fff;
    line-height:20px;
    outline:none;
}
#featured li.ui-tabs-nav-item a:hover{
    background:#f2f2f2;
}
#featured li.ui-tabs-selected{ /*Selected tab style*/
    background:url('images/selected-item.gif') top left no-repeat;
}
#featured ul.ui-tabs-nav li.ui-tabs-selected a{
    background:#ccc;
}
#featured ul.ui-tabs-nav li img{
    float:left; margin:2px 5px;
    background:#fff;
    padding:2px;
    border:1px solid #eee;
}
#featured .ui-tabs-panel .info{
    position:absolute;
    top:180px; left:0;
    height:70px; width: 400px;
    background: url('images/transparent-bg.png');
}
#featured .info h2{
    font-size:18px; font-family:Georgia, serif;
    color:#fff; padding:5px; margin:0;
    overflow:hidden;
}
#featured .info p{
    margin:0 5px;
    font-family:Verdana; font-size:11px;
    line-height:15px; color:#f0f0f0;
}
#featured .info a{
    text-decoration:none;
    color:#fff;
}
#featured .info a:hover{
  text-decoration:underline;
}
Customize :
The red text can replace with selected image
The blue text can replace with transparent image
5. Just click Save Template
    After that, go to Page Elements --> Add Gadget. Choose "HTML/JavaScript"
    Try to place this contents slider under your blog title or tabs.
6. Copy the code below, and paste on it
<div id="featured" >
    <ul class="ui-tabs-nav">
        <li class="ui-tabs-nav-item ui-tabs-selected" id="nav-fragment-1"><a href="#fragment-1"><img src="images/image1-small.jpg" alt="" /><span>15+ Excellent High Speed Photographs</span></a></li>
        <li class="ui-tabs-nav-item" id="nav-fragment-2"><a href="#fragment-2"><img src="images/image2-small.jpg" alt="" /><span>20 Beautiful Long Exposure Photographs</span></a></li>
        <li class="ui-tabs-nav-item" id="nav-fragment-3"><a href="#fragment-3"><img src="images/image3-small.jpg" alt="" /><span>35 Amazing Logo Designs</span></a></li>
        <li class="ui-tabs-nav-item" id="nav-fragment-4"><a href="#fragment-4"><img src="images/image4-small.jpg" alt="" /><span>Create a Vintage Photograph in Photoshop</span></a></li>
    </ul>
    <!-- First Content -->
    <div id="fragment-1" class="ui-tabs-panel" style="">
        <img src="images/image1.jpg" alt="" />
        <div class="info" >
        <h2><a href="#" >15+ Excellent High Speed Photographs</a></h2>
        <p>Lorem ipsum dolor sit amet, consectetur adipiscing elit. Nulla tincidunt condimentum lacus. Pellentesque ut diam....<a href="#" >read more</a></p>
        </div>
    </div>
    <!-- Second Content -->
    <div id="fragment-2" class="ui-tabs-panel ui-tabs-hide" style="">
        <img src="images/image2.jpg" alt="" />
        <div class="info" >
        <h2><a href="#" >20 Beautiful Long Exposure Photographs</a></h2>
        <p>Vestibulum leo quam, accumsan nec porttitor a, euismod ac tortor. Sed ipsum lorem, sagittis non egestas id, suscipit....<a href="#" >read more</a></p>
        </div>
    </div>
    <!-- Third Content -->
    <div id="fragment-3" class="ui-tabs-panel ui-tabs-hide" style="">
        <img src="images/image3.jpg" alt="" />
        <div class="info" >
        <h2><a href="#" >35 Amazing Logo Designs</a></h2>
        <p>liquam erat volutpat. Proin id volutpat nisi. Nulla facilisi. Curabitur facilisis sollicitudin ornare....<a href="#" >read more</a></p>
        </div>
    </div>
    <!-- Fourth Content -->
    <div id="fragment-4" class="ui-tabs-panel ui-tabs-hide" style="">
        <img src="images/image4.jpg" alt="" />
        <div class="info" >
        <h2><a href="#" >Create a Vintage Photograph in Photoshop</a></h2>
        <p>Quisque sed orci ut lacus viverra interdum ornare sed est. Donec porta, erat eu pretium luctus, leo augue sodales....<a href="#" >read more</a></p>
        </div>
    </div>
</div>
Customize :
The red text are the title of blog posts.
The blue text are the description or snippet of the blog posts
The green text are the image of the post
The pink text are the posts link (address)
7. Click Save

Thursday, March 24, 2011

How to Add "Reply" in Blogger Comment Box

Add "Reply" in blogger comment box function to facilitate the reply for every comment on our blog. So, between the visitors and the author can discuss each other. Based on the title, this trick only can do in blogger comment box. So, if you've modified blogger comment box, you, can't do this trick. Well, to shorten the time, just follow how to add "Reply" in blogger comment box.

1. Log in to your blogger account
2. Go to Design --> Edit HTML
3. Check in the "Expand Widget Templates" box
4. Find this code
<dd class='comment-footer'>
But, if you didn't find that code, try to find this code
<b:include data='comment' name='commentDeleteIcon'/>
5. Then, copy the code below, and paste under one of the code above.
<a expr:href='&quot;https://www.blogger.com/comment.g?blogID=Your Blog ID&amp;postID=&quot; + data:post.id + &quot;&amp;isPopup=true&amp;postBody=
%40%3C%61%20%68%72%65%66%3D%22%23&quot; + data:comment.anchorName + &quot;%22%3E&quot; + data:comment.author + &quot;%3C%2F%61%3E#form&quot;' onclick='javascript:window.open(this.href, &quot;bloggerPopup&quot;, &quot;toolbar=0,location=0,statusbar=1,menubar=0,scrollbars=yes,width=450,
height=450&quot;); return false;'><img alt='Reply To This Comment' src='https://blogger.googleusercontent.com/img/b/R29vZ2xl/AVvXsEh-5qHcg66wRyoTR4khkQTHvAq8MN1dRGHOahaXaP9n6GOtutdJ6Qztp4rirwnLVwidvQUHNf6OugWFDJcsE7ieZiSfEZftmwmg8eb1O8F41s0OY16v8QHQms8D9AZ-GyH9iLRkT2l3f6I/s1600/reply.gif'/></a>
Customize:
Your Blog ID can replace with your blog ID, the location of your ID is in the address bar
http://4.bp.blogspot.com/_mWrR0gomZ0/TIIfWolwWgI/AAAAAAAAARE/nwiHJLeqSVw/
s1600/reply.gif is the "Reply" button, you can change with your own.
6. Finish! Just click Save Template

Wednesday, March 23, 2011

Blogger Release New Version Interface ?

Hi, Bloggers? Do you know, Blogger release new version interface ? Actually some steps had begun little by little since 2010.  Do you not realize it? Start from Template Designer, Real-time Stats, Spam Filter. And now in 2011, Blogger will make bigger changes. They will release the new version interface . Let's watch the video below.


Blogger said in the official blog.
The new design is not only cleaner and more modern, but it also uses Google Web Toolkit, delivering the latest in web technology.
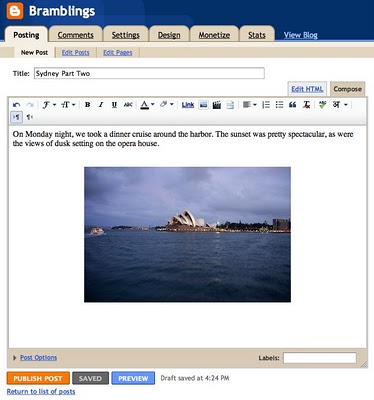
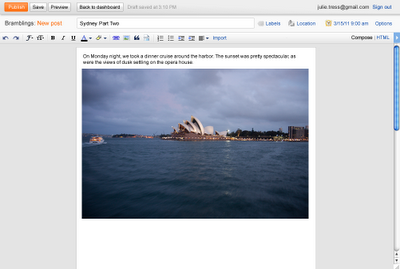
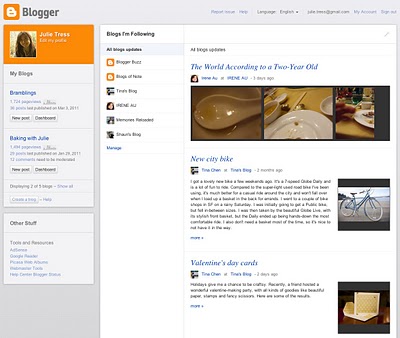
So, we're really hope, blogger can release the stylish but with more less time loading too. If, you want to know some changes. Let's see the screenshot below.

Current Post Editor


New Version


Current Dashboard


New Version


New Blogger Navbar

So, we just wait. What blogger team do for the new version interface.

Sunday, March 20, 2011

How To Create Automatic Table of Contents

Now we will discuss about How To Create Automatic Table of Contents. Usually, if we have many blog posts, we will hard to set all of the blog posts. Beside that, some SEO practitioners said, table of contents (Sitemap) can accelerate the process of indexing the new article. This table of contents is sorted by the labels. So, it looks interesting. Now, if you want to know how to create automatic table of contents, just follow the steps below.

1. Log in to your blogger account
2. Go to Posting --> New Post
3. Then click "Edit HTML"
4. Copy the code below, and paste on it
<script src="https://docs.google.com/uc?id=0BwXqkC35im9QMzEyZWMxMzMtOGFjOC00MjQ1LWJmYzEtZDBjYTc2OTkxYTZj&
export=download&hl=en">
</script>
<script src="http://full-tricks.blogspot.com/feeds/posts/default?max-results=9999&amp;alt=json-in-script&amp;callback=loadtoc">
</script>
Customize :
full-tricks.blogspot.com is my blog address, so replace with your own blog address


5. Just click Publish Post

How to Remove Quick Edit Icon

Quick Edit in Blogger is symbolized by plier and screwdriver. Maybe for some bloggers, Quick Edit are common. But, some also consider this a disturbing thing. Actually, Quick Edit will not appear, if we are not currently logged on blogger account. By the way, Can we remove Quick Edit Icon? Sure, It's easy. Just follow the steps below.


1. Log in to your blogger account
2. Go to Design --> Edit HTML
3. Copy the code below, and paste above ]]></b:skin>
.quickedit{
    display:none;
    }
4. Just click  Save Template , Easy right?

How to Change Blog Title with Post Title

Hello, friends! Do you ever think about how to change blog title with post title? If you have, you're lucky today. Because we will discuss about How to Change Blog Title with Post Title. Many bloggers said, it can raise our blog SEO. For the details, you can read the explanation below.

Now you can check this, for example here is a blog with Blog Title as "Comutricks" and a blog Post Title "How to Boost Download Speed"
By Default, the Post title appears like this:
Comutricks : How to Boost Download Speed
But, after you followed this trick, the title will look like this
How to Boost Download Speed | Comutricks  

The second title looks better as the subject matter of the blog post. This is also good for search engine optimization. So, if you want to know how to change blog title with post title, just follow the steps below.

1. Log in to your blogger acccount
2. Go to Design --> Edit HTML
3. Find this code
<title><data:blog.title/></title>
What? If you didn't find that code, try to find this code
<title><data:blog.pageTitle/></title>
4. Then, replace one of the code above, with code below.
<b:if cond='data:blog.pageType == "item"'>
<title><data:blog.pageName/> | <data:blog.title/></title>
<b:else/>
<title><data:blog.pageTitle/></title> </b:if>
5. Finish! Just click Save Template

Saturday, March 19, 2011

Text Hover Effect with Shadow

We know what is link hover. So, text hover is almost same with link hover. The difference only, if link hover has a web address, but if text hover doesn't have a web address. Actually the trick of Text Hover Effect with Shadow is very simple. Try to put your mouse on the text below.

Full Blog Tricks provides many blogger tricks, blogger hacks, and blogger widgets. We also give you many SEO tips to increase your blog performance in Search Engine.

To make this text hover, you just need the script below.
<style type="text/css">
#rachmath:hover .rachma, #rachmath.hover_effect .rachma {text-shadow: 0 0 10px #000}
</style>
<div id="rachmath">
<div class="rachma" id="rachmath">
WRITE YOUR TEXT HERE
</div>
</div>
Customize :
#000 is the color of the shadow, you can change the color.
WRITE YOUR TEXT HERE is the place where you can put your text

Finish! Simple right?

How to Add Labels with Thumbnail

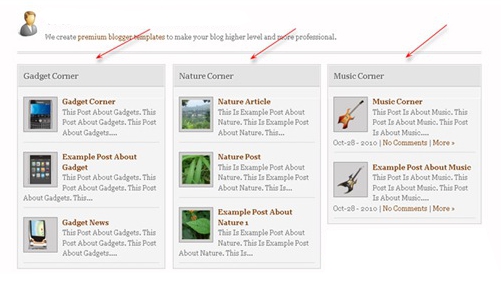
Finally, I've found a great trick for share to you. That's How to Add Labels with Thumbnail. With this trick, you can display some your blog posts based by the label on the homepage. So, your visitors will see many posts that neatly aranged in one page. Let's see the example of labels with thumbnail.
Now, if you want to know how to add labels with thumbnail, just follow the steps below.

1. Log in to your blogger account
2. Go to Design --> Edit HTML
3. Then, check in the "Expand Widget Templates" box
4. Copy the code below, and paste above ]]></b:skin>

/*** Featured Categories ***/
     img.label_thumb{
        float:left;
padding:5px;
border:1px solid #8f8f8f;
background:#D2D0D0;
margin-right:10px;
height:55px;
width:55px;
}
     img.label_thumb:hover{
background:#f7f6f6;
}
     .label_with_thumbs {
float: left;
width: 100%;
min-height: 70px;
margin: 0px 10px 2px 0px;
adding: 0;
}
     ul.label_with_thumbs li {
padding:8px 0;
min-height:65px;
margin-bottom:10px;
}
    .label_with_thumbs a {}
    .label_with_thumbs strong {}

5. After that, copy the code below and paste above </head>

<script type='text/javascript'>
//<![CDATA[
function labelthumbs(json){document.write('<ul class="label_with_thumbs">');for(var i=0;i<numposts;i++){var entry=json.feed.entry[i];var posttitle=entry.title.$t;var posturl;if(i==json.feed.entry.length)break;for(var k=0;k<entry.link.length;k++){if(entry.link[k].rel=='replies'&&entry.link[k].type=='text/html'){var commenttext=entry.link[k].title;var commenturl=entry.link[k].href;}
if(entry.link[k].rel=='alternate'){posturl=entry.link[k].href;break;}}var thumburl;try{thumburl=entry.media$thumbnail.url;}catch(error)
{s=entry.content.$t;a=s.indexOf("<img");b=s.indexOf("src=\"",a);c=s.indexOf("\"",b+5);d=s.substr(b+5,c-b-5);if((a!=-1)&&(b!=-1)&&(c!=-1)&&(d!="")){thumburl=d;}else thumburl='https://blogger.googleusercontent.com/img/b/R29vZ2xl/AVvXsEgrfAtGqRQyI5Zh58Kq_lWIQStJHDpWqbVWWoG4L4EWfTLduSm7pKra_9_m1agrrNUke8XlcG0Kjxjw4DcFhmY8g-Yvf5YZ_knWgQFY8UxrtqRMJnrhP_eb5C7Vz2tWkcoe5uwC_Vc_DdGd/';}
var postdate=entry.published.$t;var cdyear=postdate.substring(0,4);var cdmonth=postdate.substring(5,7);var cdday=postdate.substring(8,10);var monthnames=new Array();monthnames[1]="Jan";monthnames[2]="Feb";monthnames[3]="Mar";monthnames[4]="Apr";monthnames[5]="May";monthnames[6]="Jun";monthnames[7]="Jul";monthnames[8]="Aug";monthnames[9]="Sep";monthnames[10]="Oct";monthnames[11]="Nov";monthnames[12]="Dec";document.write('<li class="clearfix">');if(showpostthumbnails==true)
document.write('<a href="'+posturl+'" target ="_top"><img class="label_thumb" src="'+thumburl+'"/></a>');document.write('<strong><a href="'+posturl+'" target ="_top">'+posttitle+'</a></strong><br>');if("content"in entry){var postcontent=entry.content.$t;}
else
if("summary"in entry){var postcontent=entry.summary.$t;}
else var postcontent="";var re=/<\S[^>]*>/g;postcontent=postcontent.replace(re,"");if(showpostsummary==true){if(postcontent.length<numchars){document.write('');document.write(postcontent);document.write('');}
else{document.write('');postcontent=postcontent.substring(0,numchars);var quoteEnd=postcontent.lastIndexOf(" ");postcontent=postcontent.substring(0,quoteEnd);document.write(postcontent+'...');document.write('');}}
var towrite='';var flag=0;document.write('<br>');if(showpostdate==true){towrite=towrite+monthnames[parseInt(cdmonth,10)]+'-'+cdday+' - '+cdyear;flag=1;}
if(showcommentnum==true)
{if(flag==1){towrite=towrite+' | ';}
if(commenttext=='1 Comments')commenttext='1 Comment';if(commenttext=='0 Comments')commenttext='No Comments';commenttext='<a href="'+commenturl+'" target ="_top">'+commenttext+'</a>';towrite=towrite+commenttext;flag=1;;}
if(displaymore==true)
{if(flag==1)towrite=towrite+' | ';towrite=towrite+'<a href="'+posturl+'" class="url" target ="_top">More »</a>';flag=1;;}
document.write(towrite);document.write('</li>');if(displayseparator==true)
if(i!=(numposts-1))
document.write('');}document.write('</ul>');}
//]]>
</script>

6. OK, just click Save Template

Friday, March 18, 2011

How to Add Related Posts with Thumbnail

Hi friends! . Previously, I've posted about How To Make Related Article In Blog. Now, I will post about How to Add Related Posts with Thumbnail. If you don't know what is related posts with thumbnail, you can see under Full Blog Tricks posts. There are some posts title with thumbnail (reduced-size versions of pictures). The function of related posts is to increase our blog pageviews. Interested? Just follow the steps below.

1. Log in to your blogger account.
2. Go to Design --> Edit HTML
3. Check in the "Expand Widget Templates" box
4. Copy the code below, and paste above </head>

<!--Related Posts with thumbnails Scripts and Styles Start-->
<b:if cond='data:blog.pageType == &quot;item&quot;'>
<style type="text/css">
#related-posts {
float:center;
text-transform:none;
height:100%;
min-height:100%;
padding-top:5px;
padding-left:5px;
}

#related-posts h2{
font-size: 1.6em;
font-weight: bold;
color: #585858;
font-family: Georgia, &#8220;Times New Roman&#8221;, Times, serif;
margin-bottom: 0.75em;
margin-top: 0em;
padding-top: 0em;
}
#related-posts a{
color:#FFFFCC;
}
#related-posts a:hover{
color:#000000;
}

#related-posts a:hover {
background-color:#d4eaf2;
}
</style>
<script src='http://blogergadgets.googlecode.com/files/relatedthumbs21.js' type='text/javascript'/>
</b:if>
<!--Related Posts with thumbnails Scripts and Styles End-->

5.  Then find this code
<div class='post-footer-line post-footer-line-1'>
But, if you didn't find that code, try to find the code below
<p class='post-footer-line post-footer-line-1'>
6. After that copy the code below, and paste under one of the code above

<!-- Related Posts with Thumbnails Code Start-->
<b:if cond='data:blog.pageType == &quot;item&quot;'>
<div id='related-posts'>
<b:loop values='data:post.labels' var='label'>
<b:if cond='data:label.isLast != &quot;true&quot;'>
</b:if>
<b:if cond='data:blog.pageType == &quot;item&quot;'>
<script expr:src='&quot;/feeds/posts/default/-/&quot; + data:label.name + &quot;?alt=json-in-script&amp;callback=related_results_labels_thumbs&amp;max-results=6&quot;' type='text/javascript'/></b:if></b:loop>
<script type='text/javascript'>
var currentposturl=&quot;<data:post.url/>&quot;;
var maxresults=5;
var relatedpoststitle="Related Posts";
removeRelatedDuplicates_thumbs();
printRelatedLabels_thumbs();
</script>
</div><div style='clear:both'/>
</b:if>
<!-- Related Posts with Thumbnails Code End-->

Customize :
var maxresults=5; is the maximum result of the related posts that shown in every post
var relatedpoststitle="Related Posts"; is the title of the related posts

7. If you've finished with your settings, just click Save Template