Friday, December 24, 2010

How To Make A Word To Follow Cursor

OK, if in the previous I have posted How To Make A Clock And Calendar To Follow The Cursor , now i  will post How To Make A Word To Follow Cursor. The effect will make your text around the cursor. Now i wil give the steps.

1. Log in to your blogger account
2. Go to Desgin>>>Page Elements>>>Add Gadget
3. Choose "HTML/Java Script"
4. Then copy the code below, and paste in the place

<style type='text/css'>
#outerCircleText {
font-style: italic;
font-weight: bold;
font-family: 'comic sans ms', verdana, arial;
color: #0000ff;
position: absolute;top: 0;left: 0;z-index: 3000;cursor: default;}
#outerCircleText div {position: relative;}
#outerCircleText div div {position: absolute;top: 0;left: 0;text-align: center;}
</style>

<script type='text/javascript'>
//<![CDATA[
;(function(){
// Your message here (QUOTED STRING)
var msg = "Comments";
/* THE REST OF THE EDITABLE VALUES BELOW ARE ALL UNQUOTED NUMBERS */
// Set font's style size for calculating dimensions
// Set to number of desired pixels font size (decimal and negative numbers not allowed)
var size =20;
// Set both to 1 for plain circle, set one of them to 2 for oval
// Other numbers & decimals can have interesting effects, keep these low (0 to 3)
var circleY = 0.75; var circleX = 2;
// The larger this divisor, the smaller the spaces between letters
// (decimals allowed, not negative numbers)
var letter_spacing = 5;
// The larger this multiplier, the bigger the circle/oval
// (decimals allowed, not negative numbers, some rounding is applied)
var diameter = 10;
// Rotation speed, set it negative if you want it to spin clockwise (decimals allowed)
var rotation = 0.4;
// This is not the rotation speed, its the reaction speed, keep low!
// Set this to 1 or a decimal less than one (decimals allowed, not negative numbers)
var speed = 0.3;
////////////////////// Stop Editing //////////////////////
if (!window.addEventListener && !window.attachEvent || !document.createElement) return;
msg = msg.split('');
var n = msg.length - 1, a = Math.round(size * diameter * 0.208333), currStep = 20,
ymouse = a * circleY + 20, xmouse = a * circleX + 20, y = [], x = [], Y = [], X = [],
o = document.createElement('div'), oi = document.createElement('div'),
b = document.compatMode && document.compatMode != "BackCompat"? document.documentElement
:
document.body,
mouse = function(e){
e = e || window.event;
ymouse = !isNaN(e.pageY)? e.pageY : e.clientY; // y-position
xmouse = !isNaN(e.pageX)? e.pageX : e.clientX; // x-position
},
makecircle = function(){ // rotation/positioning
if(init.nopy){
o.style.top = (b || document.body).scrollTop + 'px';
o.style.left = (b || document.body).scrollLeft + 'px';
};
currStep -= rotation;
for (var d, i = n; i > -1; --i){ // makes the circle
d = document.getElementById('iemsg' + i).style;
d.top = Math.round(y[i] + a * Math.sin((currStep + i) / letter_spacing) * circleY - 15) +
'px';
d.left = Math.round(x[i] + a * Math.cos((currStep + i) / letter_spacing) * circleX) + 'px';
};
},
drag = function(){ // makes the resistance
y[0] = Y[0] += (ymouse - Y[0]) * speed;
x[0] = X[0] += (xmouse - 20 - X[0]) * speed;
for (var i = n; i > 0; --i){
y[i] = Y[i] += (y[i-1] - Y[i]) * speed;
x[i] = X[i] += (x[i-1] - X[i]) * speed;
};
makecircle();
},
init = function(){ // appends message divs, & sets initial values for positioning arrays
if(!isNaN(window.pageYOffset)){
ymouse += window.pageYOffset;
xmouse += window.pageXOffset;
} else init.nopy = true;
for (var d, i = n; i > -1; --i){
d = document.createElement('div'); d.id = 'iemsg' + i;
d.style.height = d.style.width = a + 'px';
d.appendChild(document.createTextNode(msg[i]));
oi.appendChild(d); y[i] = x[i] = Y[i] = X[i] = 0;
};
o.appendChild(oi); document.body.appendChild(o);
setInterval(drag, 25);
},
ascroll = function(){
ymouse += window.pageYOffset;
xmouse += window.pageXOffset;
window.removeEventListener('scroll', ascroll, false);
};
o.id = 'outerCircleText'; o.style.fontSize = size + 'px';
if (window.addEventListener){
window.addEventListener('load', init, false);
document.addEventListener('mouseover', mouse, false);
document.addEventListener('mousemove', mouse, false);
if (/Apple/.test(navigator.vendor))
window.addEventListener('scroll', ascroll, false);
}
else if (window.attachEvent){
window.attachEvent('onload', init);
document.attachEvent('onmousemove', mouse);
};
})();
//]]>
</script>

NOTE : #0000ff with your color choice
             Comments with your message

5. If finished, save it now

How To Add HTML/Java Script Color Picker In Blog

This tool is used to select a color and then convert into script language. This tool is useful for you who don't know kinds of color script


If you want to add this chart into your blog, you can follow the steps

Installation as usual
1. Log in to your blogger account
2. Go to Design>>>Page Elements>>>Add Gadget
3. Choose "HTML/Java Script"
4. Copy the code below, and paste in the place
<script src="http://www.gmodules.com/ig/ifr?url=http://hosting.gmodules.com/ig/gadgets/file/103534220535816043845/colorpicker.xml&amp;up_save=1&amp;up_rgb=255%7C255%7C255&amp;up_basergb=255%7C0%7C0&amp;up_hex=FFFFFF&amp;up_indicator=0%7C0&amp;up_slider=0&amp;up_lastvalues=0%7C0&amp;synd=open&amp;w=325&amp;h=210&amp;title=HTML%2FJava+Script+Color+Picker&amp;border=http%3A%2F%2Fwww.gmodules.com%2Fig%2Fimages%2F&amp;output=js"></script>
5. Save it

If you want to modify the border, width, and length, you can go here

How To Set Backlinks Checker Tool In Blog

Do you know, what is backlinks? Backlinks are links to our blog or website. The number of backlins is one of indication of the popularity of that website. Usually backlinks is used to determine the PageRank of a website. But, do you know the number of your blog backlinks? If you don't know, you can following the steps and add thw tool into your blog, so you can check your backlinks.

1. Log in to your blogger account
2. Go to Design>>>Page Elements>>>Add Gadget
3. Choose "HTML/Java Script"
4. Copy the code below, and paste in the place
<!-- iWEBTOOL - www.iwebtool.com - Backlink Checker -->
<form method="get" name="pageform" action="http://www.iwebtool.com/tool/tools/backlink_checker/backlink_checker.php"  target="pageframe" onsubmit="return validate(this);">
<table border="0" style="border-collapse: collapse" width="100%">
<tr>
<td width="956" height="91" valign="top">
<table style="border-collapse: collapse" width="100%" height="76" class="tooltop">
<tr>
<td>
<table border="0" style="border-collapse: collapse" width="100%" cellspacing="5">
<tr>
<td height="28" width="184"><b><font size="2">Your domain:
</font></b></td>
<td height="28" width="239">
<input type="text" name="domain" size="33"></td>
<td height="28" width="529">
<input type="submit" value="Check Now!" style="float: left"></td>
</tr>
<tr>
<td width="184" height="21">&nbsp;</td>
<td width="770" colspan="2" height="21" valign="top"><font size="1">(eg. full-tricks.blogspot.com.com)</font></td>
</tr>
</table>
</td>
</tr>
</table>
</td>
</tr>
<tr>
<td width="956">
<iframe name="pageframe" width="100%" height="530" class="toolbot" frameborder="0">
</iframe></td>
</tr>
<tr>
<td width="956">
&nbsp;</td>
</tr>
</table>
</form>
<script language="JavaScript">
function validate(theform) {
if (theform.domain.value == "") { alert("No domain provided"); return false; }
return true;
}
</script><p><a href="http://www.iwebtool.com/" target="_blank"><font size=1>Powered by iWEBTOOL</font></a></p>
<!-- iWEBTOOL - www.iwebtool.com - Backlink Checker -->
5. Finish? Save it now!
If you finish, the result is like this (only the image)

Thursday, December 23, 2010

How To Install HTML Parser Tool In Blog

Usually, if you want to parse html, you will go to Centricle, Blogcrowds, or the other. Now, I found a trick to install the tool in your blog. This trick will install the tool into your blog. Before I give the steps, i will show the result


If you are inteterested, you just follow the steps
1. Log in to your blogger account
2. Go to Design>>>Page Elements>>>Add Gadget
3. Choose "HTM/Java Script"
4. Then, copy the code below and paste on it
<script src="http://www.gmodules.com/ig/ifr?url=http://hosting.gmodules.com/ig/gadgets/file/102462998830435293579/post-Code.xml&amp;up_grows=10&amp;up_conv1=1&amp;up_conv2=1&amp;up_conv3=1&amp;up_conv4=1&amp;up_conv5=1&amp;synd=open&amp;w=320&amp;h=200&amp;title=Post-Code%3A+code+converter&amp;border=http%3A%2F%2Fwww.gmodules.com%2Fig%2Fimages%2F&amp;output=js"></script>
5. Finish? Save it
Don't close first! I have important information! If you want to create your own, you can go here

Wednesday, December 22, 2010

How To Show Widget Only In "Home"

Actually, this trick is "sequel" of How To Show Widget Only In Next Page (Not in "Home"). So, what's the difference? The difference is this trick only show the widget in "Home". As an example, we will edit the "Get Free Banner!" widget. OK, you just follow the steps, if you want to try this trick.

1. Log in to your blogger account
2. Go to Design>>>Edit HTML>>>
3. Thick "Expand Widget Templates"
4. Then, search the code below
Tips : To speed up your search, you can use Ctrl+F or F3

<b:widget id='HTML3' locked='false' title='Get Free Banner!' type='HTML'>
<b:includable id='main'>


<!-- only display title if it's non-empty -->
<b:if cond='data:title != &quot;&quot;'>
<h2 class='title'><data:title/></h2>
</b:if>
<div class='widget-content'>
<data:content/>
</div>
<b:include name='quickedit'/>


</b:includable>
</b:widget>
(becase we will edit "Get Free Banner!")

5. After that copy the code below

<b:if cond='data:blog.homepageUrl == data:blog.url'>

6. Paste under

<b:widget id='HTML3' locked='false' title='Get Free Banner!' type='HTML'>
<b:includable id='main'>

7. Then, copy the code below

</b:if>

8. And paste under

<b:include name='quickedit'/>

So the result will look like this

<b:widget id='HTML3' locked='false' title='Get Free Banner!' type='HTML'>
<b:includable id='main'>

<b:if cond='data:blog.homepageUrl == data:blog.url'>

<!-- only display title if it's non-empty -->
<b:if cond='data:title != &quot;&quot;'>
<h2 class='title'><data:title/></h2>
</b:if>
<div class='widget-content'>
<data:content/>
</div>
<b:include name='quickedit'/>

</b:if>

</b:includable>
</b:widget>

9. If you finish, save it
NOTE : Can also be applied in other widgets

How To Show Widget Only In Next Page (Not in "Home")

In this post, i will share to you, a trick about how to show widget only in next page. Means the widget will not appear on the Home. So our blog will be seen quickly when opened on the first time. As an example, we will edit the "Get Free Banner!" widget. Immediately,  i will give you the steps.

1. Log in to your blogger account
2. Go to Design>>>Edit HTML
3. Thick "Expand Widget Templates"
4. Then search the code below
Tips : To speed up your search, you can use Ctrl+F or F3

<b:widget id='HTML3' locked='false' title='Get Free Banner!' type='HTML'>
<b:includable id='main'>

<!-- only display title if it's non-empty -->
<b:if cond='data:title != &quot;&quot;'>
<h2 class='title'><data:title/></h2>
</b:if>
<div class='widget-content'>
<data:content/>
</div>
<b:include name='quickedit'/>

</b:includable>
</b:widget>

(because i will edit "Get Free Banner!")

5. After that, copy the code below

<b:if cond='data:blog.pageType == "item"'>

6. Paste under :

<b:widget id='HTML3' locked='false' title='Get Free Banner!' type='HTML'> 
<b:includable id='main'>

7. Then, copy the code below

</b:if>

8. And paste under 

<b:include name='quickedit'/>

So the result will look like this
<b:widget id='HTML3' locked='false' title='Get Free Banner!' type='HTML'>
<b:includable id='main'>

<b:if cond='data:blog.pageType == "item"'>

<!-- only display title if it's non-empty -->
<b:if cond='data:title != &quot;&quot;'>
<h2 class='title'><data:title/></h2>
</b:if>
<div class='widget-content'>
<data:content/>
</div>
<b:include name='quickedit'/>

</b:if>

</b:includable>
</b:widget>
9. If you finish , save it
NOTE : Can also be applied in other widgets

Tuesday, December 21, 2010

How To Delete Numbers In Labels

Hi, friend! If previously, i have posted  How to make labels on posts, now i will post the hack. In this trick, we will learn how to delete the numbers. OK, i will immediately explain this trick. For details, i will provide 2 ways.

First Way 
1. Log in to your bloger account
2. Go to Design>>>Page Elements>>>Labels
3. Click "Edit" in "Labels"
4. Then, empty "Show number of posts per label"
5. Save it

Second Way
1. Go to Design>>>Edit HTML
2. Thick "Expand Widget Templates"
3. Find this code : (<data:label.count/>)
4. Then delete the code
5. Save it

How To Add Page Loading Status Image In Blog

Now, i will teach you about page loading status. If our blog has long-time loading, our blog visitors will reduce, because they are tired to waiting our blog loading. Actually, this problem can be manipulated by placing page loading status image. So, our blog visitors will not be bored anymore. Now, if you want this trick, just follow the steps below.

1. Log in to your blogger account
2. Go to Design>>>Edit HTML
3. Then search this code : <body>
Tips : To speed up the search you can use Ctrl+F or F3
4. Replace <body> with code below

<body onLoad='init()'>
<div id='loading' style='position:absolute; width:100%; text-align:center; top:300px;'> <img border='0' src='
https://sites.google.com/site/fullblogtricks/javascript-sama-edit-html/preloader.js?attredirects=0&d=1'/></div>

<script src='https://docs.google.com/uc?id=0BwXqkC35im9QMzQ1MTNiNjUtN2Q0Yy00YjM5LTliMzUtZWU0MGQ3YmVhYmZl&export=download&hl=en' type='text/javascript'/>

NOTE : Change the blue words with image URL
To facilitate you, I provides some pictures


http://i1002.photobucket.com/albums/af149/Imtikhan/Loading2.gif

http://i1002.photobucket.com/albums/af149/Imtikhan/Loading5.gif
http://i388.photobucket.com/albums/oo330/shadowxcelerated/Loading.gif

You can make your own image in Ajaxload
5. If you finish, save it and try by reload your blog

Monday, December 20, 2010

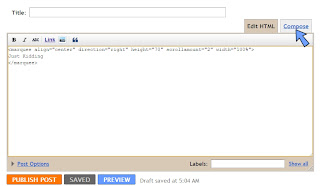
How To Activate Script In a Post

Maybe, new bloggers don't know how to activate script in a post. Usually, they only put the script as usual, then what's the different?

<marquee align="center" direction="right" height="70" scrollamount="2" width="100%">
Just Kidding 
</marquee>


If you learn this trick, you can activate the script like this

Just Kidding

Interested? Don't worry, you can follow the steps below.

1. Copy your script
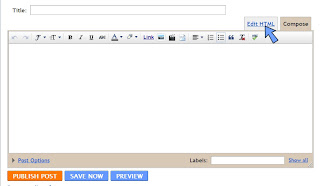
2. Then in your post, click "Edit HTML"
3. Paste your script
4. Return to "Compose"

How To Change "Older Posts", "Newer Posts", And "Home" With Icon

H, friend! Now i will teach you about how to change "Older Posts", "Newer Posts", and "Home" with an icon. Usually "Older Posts", "Newer Posts", and "Home" located under our blog. The function is direct us to go to another page, either older posts page or newer posts page. Usually, the commands ("Older Posts", "Newer Posts", "Home") are only a word, therefore we will change the word into an icon. Now, if you want this trick, just follow the steps.

1. Log in to your blogger icon
2. Go to Design>>>Edit HTML
3. Thick "Expand Widget Templates"
4. Then find this code :

<b:includable id='nextprev'>
<div class='blog-pager' id='blog-pager'>
<b:if cond='data:newerPageUrl'>
<span id='blog-pager-newer-link'>
<a class='blog-pager-newer-link' expr:href='data:newerPageUrl' expr:id='data:widget.instanceId + "_blog-pager-newer-link"' expr:title='data:newerPageTitle'><data:newerPageTitle/></a>
</span>
</b:if>


<b:if cond='data:olderPageUrl'>
<span id='blog-pager-older-link'>
<a class='blog-pager-older-link' expr:href='data:olderPageUrl' expr:id='data:widget.instanceId + "_blog-pager-older-link"' expr:title='data:olderPageTitle'><data:olderPageTitle/></a>
</span>
</b:if>


<b:if cond='data:blog.homepageUrl != data:blog.url'>
<a class='home-link' expr:href='data:blog.homepageUrl'><data:homeMsg/></a>
<b:else/>
<b:if cond='data:newerPageUrl'>
<a class='home-link' expr:href='data:blog.homepageUrl'><data:homeMsg/></a>
</b:if>
</b:if>


</div>


5. Change the blue words with image script

<img border='0' src='ICON URL'/>


Examples :
<img border='0' src='http://robots1996.fileave.com/Beranda.png'/>


<img border='0' src='http://robots1996.fileave.com/Posting_lama.gif'/>


<img border='0' src='http://robots1996.fileave.com/Posting_lebih_baru.gif'/>


So like this :

<b:includable id='nextprev'>
<div class='blog-pager' id='blog-pager'>
<b:if cond='data:newerPageUrl'>
<span id='blog-pager-newer-link'>
<a class='blog-pager-newer-link' expr:href='data:newerPageUrl' expr:id='data:widget.instanceId + "_blog-pager-newer-link"' expr:title='data:newerPageTitle'><img border='0' src='http://robots1996.fileave.com/Posting_lebih_baru.gif'/></a>
</span>
</b:if>

<b:if cond='data:olderPageUrl'>
<span id='blog-pager-older-link'>
<a class='blog-pager-older-link' expr:href='data:olderPageUrl' expr:id='data:widget.instanceId + "_blog-pager-older-link"' expr:title='data:olderPageTitle'><img border='0' src='http://robots1996.fileave.com/Posting_lama.gif'/></a>
</span>
</b:if>

<b:if cond='data:blog.homepageUrl != data:blog.url'>
<a class='home-link' expr:href='data:blog.homepageUrl'><img border='0' src='http://robots1996.fileave.com/Beranda.png'/></a>
<b:else/>
<b:if cond='data:newerPageUrl'>
<a class='home-link' expr:href='data:blog.homepageUrl'><img border='0' src='http://robots1996.fileave.com/Beranda.png'/></a>
</b:if>
</b:if>

</div>

6. If you finish, save it
NOTE : You can change the URL, with your own icon

Saturday, December 18, 2010

How To Add 3 In 1 Share Toolbar By Apture For Blog

We give readers the power to search and explore rich content and media from the web without even leaving the page.

That's Apture motto. So, Apture want to help you to browsing easily. Therefore i will teach you how to put it on your blog. Before i give the steps, i will tell you about this toolbar features.

-Share on Facebook (with counter)
-Tweet for Twitter (with counter)
-Share via Email
-Search Box


And the steps below to add Apture Toolbar.

1. Go to Apture first
2. Enter your blog URL, then click "Start Now"
3. After that fill the form, and click "Create My Account"
4. Then you will get the code, copy the code (click "Copy Code to Clipboard")
5. Now, Log in to your blogger account
6. Go to Design>>>Edit HTML
7. Find this code : </body>
8. Paste the code from Apture above </body>
9. Save it

How To Add Twitter (Updates) In Blog

Do you know? Twitter is a social networking and microblogging service, enabling its users to send and read messages called tweets. Most of the bloggers, have a  twitter account. The purpose of this trick is allows bloggers manage their blog while seeing twitter upadetes. So, i think it's very useful, try it now!

1. Go to Twitter Widgets (You must log in first)
2. Select "My Website", then click on the "Profile Widget'
3. You can setting your widget, if you finish, click "Finish &Grab Code"
4. After that, you can get the code. But, if you want to faster, click on the blogger icon
5. Widget below is example if you finish it

Friday, December 17, 2010

How To Change Read More With An Icon / Button

Usually, after we get read more code and we use it, we only have "Read More" (word), no icon or button. So how to change "Read More" (word) with an icon or button? It's very easy, just follow the steps below.

1. Log in to your blogger account
2. Go to Design>>>Edit HTML
3. Thick "Expand Widget Templates"
4. Find this word : Read More
5. Change Read More with the code below

<img border='0' src='ICON URL'/>

6. Change ICON URL with your icon URL. Example :

<img border='0' src='https://lh4.googleusercontent.com/-IZgq6Z2Kz8M/TXB8F8lMlEI/AAAAAAAAAPA/cfMaqkz24Rc/s1600/readmore_button.png'/>


7. Save it

The example of read more icon / button :


<img border='0' src='http://www.tpmi.org/images/66251/ReadMoreButton.gif'/>


<img border='0' src='http://www.visitsouthwales.com/img/buttons/read-more-button.jpg'/>


<img border='0' src='http://www.newbingobilly.com/shared/images/read-more-button.gif'/>


<img border='0' src='http://www.merricksystems.com/assets/images/button-read-more.gif'/>


<img border='0' src='http://www.pangaeaworld.com/images/read_more_button.gif'/>

Find another Read More icon / button by search in Google

How To Add Automatic "Read More" In Blog

Read more have a function for save our blog home page. Because if we are not using read more, our home page will heavy and can cause decrease our blog speed. Beside that, read more can excite our visitors to read our blog article. So, why you don't try it now? Just follow the steps below.

1. Log in to your blogger account
2. Go to Design>>>Edit HTML
3. Find this code : </head>
4. Copy the code below

<script type='text/javascript'>
var thumbnail_mode = "float" ;
summary_noimg = 250;
summary_img = 250;
img_thumb_height = 120;
img_thumb_width = 120;
</script>

<script type='text/javascript'>
//<![CDATA[
function removeHtmlTag(strx,chop){
if(strx.indexOf("<")!=-1)
{
var s = strx.split("<");
for(var i=0;i<s.length;i++){
if(s[i].indexOf(">")!=-1){
s[i] = s[i].substring(s[i].indexOf(">")+1,s[i].length);
}
}
strx = s.join("");
}
chop = (chop < strx.length-1) ? chop : strx.length-2;
while(strx.charAt(chop-1)!=' ' && strx.indexOf(' ',chop)!=-1) chop++;
strx = strx.substring(0,chop-1);
return strx+'...';
}

function createSummaryAndThumb(pID){
var div = document.getElementById(pID);
var imgtag = "";
var img = div.getElementsByTagName("img");
var summ = summary_noimg;
if(img.length>=1) {
imgtag = '<span style="float:left; padding:0px 10px 5px 0px;"><img src="'+img[0].src+'" width="'+img_thumb_width+'px" height="'+img_thumb_height+'px"/></span>';
summ = summary_img;
}

var summary = imgtag + '<div>' + removeHtmlTag(div.innerHTML,summ) + '</div>';
div.innerHTML = summary;
}
//]]>
</script>

7. Paste the code above </head>
8. Then, find this code : <data:post.body/>
9. Change <data:post.body/> with code below

<b:if cond='data:blog.pageType != "item"'>
<div expr:id='"summary" + data:post.id'><data:post.body/></div>
<script type='text/javascript'>createSummaryAndThumb("summary<data:post.id/>");</script>
<span class='rmlink' style='float:left'><a expr:href='data:post.url'>Read More</a></span>
</b:if>
<b:if cond='data:blog.pageType == &quot;item&quot;'><data:post.body/></b:if>

10. Save it

How To Make A Clock And Calendar To Follow The Cursor

Give star effect on the cursor? That's usual. Change the cursor with another icon? Easy. If, make a clock and calendar to follow the cursor? It's amazing. Maybe this trick is rarely found on other blogs, but to give thebest for readers, we are ready to post a rare trick. Directly, if you want to try this trick, just follow the steps below.

1. Log in to your blogger account
2. Go to Design>>>Page Elements>>>Add Gadget
3. Choose HTML/Java Script
4. Get the HTML code
5. Copy and paste in the place
6. Save it

How To Set Marquee Effect (Running Text) In Title Bar

Now, many people like marquee effect. They like it because marquee are simple and attractive widget. Usually they put the marquee in the sidebar. But, I will teach you how to put it on the Title Bar. By the way, do you know Title Bar? Title Bar is a tab which contain the name of the page.
OK if you already know Title Bar, you can learn it by following the steps below

1. Log in to your blogger account
2. Go to Design>>>Edit HTML
3. Find this code : </head>
4. Copy the code below

<script type='text/javascript'>
//<![CDATA[
function tb9_makeArray(n){
this.length = n;
return this.length;
}
tb9_messages = new tb9_makeArray(1);
tb9_messages[0] = "Welcome To My Blog";
tb9_rptType = 'infinite';
tb9_rptNbr = 5;
tb9_speed = 100;
tb9_delay = 2000;
var tb9_counter=1;
var tb9_currMsg=0;
var tb9_timerID = null
var tb9_bannerRunning = false
var tb9_state = ""
tb9_clearState()
function tb9_stopBanner() {
if (tb9_bannerRunning)
clearTimeout(tb9_timerID)
tb9_timerRunning = false
}
function tb9_startBanner() {
tb9_stopBanner()
tb9_showBanner()
}
function tb9_clearState() {
tb9_state = ""
for (var i = 0; i < tb9_messages[tb9_currMsg].length; ++i) {
tb9_state += "0"
}
}
function tb9_showBanner() {
if (tb9_getString()) {
tb9_currMsg++
if (tb9_messages.length <= tb9_currMsg) {
if ((tb9_rptType == 'finite') && (tb9_counter==tb9_rptNbr)){
tb9_stopBanner();
return;
}
tb9_counter++;
tb9_currMsg=0;
}
tb9_clearState()
tb9_timerID = setTimeout("tb9_showBanner()", tb9_delay)
}
else {
var tb9_str = ""
for (var j = 0; j < tb9_state.length; ++j) {
tb9_str += (tb9_state.charAt(j) == "1") ? tb9_messages[tb9_currMsg].charAt(j) : "____"
}
document.title = tb9_str
tb9_timerID = setTimeout("tb9_showBanner()", tb9_speed)
}
}
function tb9_getString() {
var full = true
for (var j = 0; j < tb9_state.length; ++j) {
if (tb9_state.charAt(j) == 0)
full = false
}
if (full) return true
while (1) {
var num = tb9_getRandom(tb9_messages[tb9_currMsg].length)
if (tb9_state.charAt(num) == "0")
break
}
tb9_state = tb9_state.substring(0, num) + "1" + tb9_state.substring(num + 1, tb9_state.length)
return false
}
function tb9_getRandom(max) {
var now = new Date()
var num = now.getTime() * now.getSeconds() * Math.random()
return num % max
}
tb9_startBanner()

//]]>
</script>


5. Paste above </head>
6. Save it

NOTE : Change the red words with your message (Welcome To My Blog)

Thursday, December 16, 2010

How To Make A Marquee Effect (Running Text) In Blog

What is marquee? Marquee is a HTML program to make a running/moving text. Many people like this, because by wearing marquee in our blog, the blog will be attractive. Before I tell how to make it, it's better for you to know some HTML code in marquee.

Marquee can be made with tag <marquee>. . .</marquee>


bgcolor="color" (set the background color)

direction="left/right/up/down" (set the direction)

behavior="scroll/side/alternate" (set the characteristic of text)

tittle="message" (your message that will be display)

scrollamount="number" (set the speed of text)

scrolldelay="number" (set the delay time)

loop="number" (set the number of loops)

width="number" (set the width of text background)

height="number" (set the height of text background)

NOTE : Change the blue word

Confuse? I give you some examples, see below

<marquee align="center" direction="right" height="70" scrollamount="2" width="100%">
Give us a comment
</marquee>

Give us a comment


<marquee align="center" direction="left" height="70" scrollamount="3" width="100%" behavior="alternate">
Follow us
</marquee>

Follow us


<marquee bgcolor="RED" width="100%" scrollamount="3" behavior="alternate">
Get many tricks for your blog
</marquee>

Get many tricks for your blog


<marquee onmouseover="this.stop( ) " onmouseout="this.start ( ) " scrollamount="2" drection="up" width="100%" height="100" align="center">
Follow us
</marquee>
Follow us


For another marquee effect, you can change the HTML code and make your own attractive marquee effect!

Saturday, December 11, 2010

How to Add Rainbow Effect For Link And Post Title

Usually when we moved our cursor to the post title, the color on the title will change. But the change is only one color. Therefore, I will teach you how to change the color into Rainbow Effect. So, if you want to learn it, just follow the steps below.

1. Log in to your blogger account
2. Go to Design>>>Edit HTML
3. Find this code : </head>
3. Then copy the code below


<script type='text/javascript'>


 //<![CDATA[


 var rate = 20;


 if (document.getElementById)
  window.onerror=new Function("return true")


 var objActive;  // The object which event occured in
  var act = 0;    // Flag during the action
  var elmH = 0;   // Hue
  var elmS = 128; // Saturation
  var elmV = 255; // Value
  var clrOrg;     // A color before the change
  var TimerID;    // Timer ID


 if (document.all) {
  document.onmouseover = doRainbowAnchor;
  document.onmouseout = stopRainbowAnchor;
  }
  else if (document.getElementById) {
  document.captureEvents(Event.MOUSEOVER | Event.MOUSEOUT);
  document.onmouseover = Mozilla_doRainbowAnchor;
  document.onmouseout = Mozilla_stopRainbowAnchor;
  }


 function doRainbow(obj)
  {
  if (act == 0) {
  act = 1;
  if (obj)
  objActive = obj;
  else
  objActive = event.srcElement;
  clrOrg = objActive.style.color;
  TimerID = setInterval("ChangeColor()",100);
  }
  }


 function stopRainbow()
  {
  if (act) {
  objActive.style.color = clrOrg;
  clearInterval(TimerID);
  act = 0;
  }
  }


 function doRainbowAnchor()
  {
  if (act == 0) {
  var obj = event.srcElement;
  while (obj.tagName != 'A' && obj.tagName != 'BODY') {
  obj = obj.parentElement;
  if (obj.tagName == 'A' || obj.tagName == 'BODY')
  break;
  }


 if (obj.tagName == 'A' && obj.href != '') {
  objActive = obj;
  act = 1;
  clrOrg = objActive.style.color;
  TimerID = setInterval("ChangeColor()",100);
  }
  }
  }


 function stopRainbowAnchor()
  {
  if (act) {
  if (objActive.tagName == 'A') {
  objActive.style.color = clrOrg;
  clearInterval(TimerID);
  act = 0;
  }
  }
  }


 function Mozilla_doRainbowAnchor(e)
  {
  if (act == 0) {
  obj = e.target;
  while (obj.nodeName != 'A' && obj.nodeName != 'BODY') {
  obj = obj.parentNode;
  if (obj.nodeName == 'A' || obj.nodeName == 'BODY')
  break;
  }


 if (obj.nodeName == 'A' && obj.href != '') {
  objActive = obj;
  act = 1;
  clrOrg = obj.style.color;
  TimerID = setInterval("ChangeColor()",100);
  }
  }
  }


 function Mozilla_stopRainbowAnchor(e)
  {
  if (act) {
  if (objActive.nodeName == 'A') {
  objActive.style.color = clrOrg;
  clearInterval(TimerID);
  act = 0;
  }
  }
  }


 function ChangeColor()
  {
  objActive.style.color = makeColor();
  }


 function makeColor()
  {
  // Don't you think Color Gamut to look like Rainbow?


 // HSVtoRGB
  if (elmS == 0) {
  elmR = elmV;    elmG = elmV;    elmB = elmV;
  }
  else {
  t1 = elmV;
  t2 = (255 - elmS) * elmV / 255;
  t3 = elmH % 60;
  t3 = (t1 - t2) * t3 / 60;


 if (elmH < 60) {
  elmR = t1;  elmB = t2;  elmG = t2 + t3;
  }
  else if (elmH < 120) {
  elmG = t1;  elmB = t2;  elmR = t1 - t3;
  }
  else if (elmH < 180) {
  elmG = t1;  elmR = t2;  elmB = t2 + t3;
  }
  else if (elmH < 240) {
  elmB = t1;  elmR = t2;  elmG = t1 - t3;
  }
  else if (elmH < 300) {
  elmB = t1;  elmG = t2;  elmR = t2 + t3;
  }
  else if (elmH < 360) {
  elmR = t1;  elmG = t2;  elmB = t1 - t3;
  }
  else {
  elmR = 0;   elmG = 0;   elmB = 0;
  }
  }


 elmR = Math.floor(elmR).toString(16);
  elmG = Math.floor(elmG).toString(16);
  elmB = Math.floor(elmB).toString(16);
  if (elmR.length == 1)    elmR = "0" + elmR;
  if (elmG.length == 1)    elmG = "0" + elmG;
  if (elmB.length == 1)    elmB = "0" + elmB;


 elmH = elmH + rate;
  if (elmH >= 360)
  elmH = 0;


 return '#' + elmR + elmG + elmB;
  }


 //]]>


 </script>


7. And paste it above </head>
8. Save and try it

Friday, December 10, 2010

How To Add Facebook Like Button For Blog

In Facebook we can like our friend's status. We just click the like button. But in blog, we didn't find this feature. So, I try to bring it to blog. For example you can see it in my every post, there is facebook like button on the top. OK, if you want to try this trick to your blog, just follow the steps below.

1. Log in to your blogger account
2. Go to Design>>>Edit HTML
3. Thick "Expand Widget Templates"
4. Find this code : <div class='post-header-line-1'/>
5. Then copy the below, and paste under <div class='post-header-line-1'/>

<b:if cond='data:blog.pageType == &quot;item&quot;'>
<iframe allowTransparency='true' expr:src='&quot;http://www.facebook.com/plugins/like.php?href=&quot; + data:post.url + &quot;&amp;layout=standard&amp;show_faces=false&amp;width=100&amp;action=like&amp;font=arial&amp;colorscheme=light&quot;' frameborder='0' scrolling='no' style='border:none; overflow:hidden; width:450px; height:40px;'/>
</b:if>


6. But, if you didn't find <div class='post-header-line-1'/>, try to find this code <data:post.body/>
7. If you use  <data:post.body/>, paste the facebook like button code above <data:post.body/>
8. Save it

Thursday, December 9, 2010

How to Add Emoticons in Comment Box

This tricks is very useful for you who want to modify the comment box. Why? Because, if you learn this trick you can add emoticons to your comment box. By the way, do you know Emoticon? Emoticon is a facial expression pictorially represented by punctuation and letters, usually to express a writer’s mood. Now, i will teach you how to add emoticons.

1. Log in to your blogger account
2. Go to Design>>>Edit HTML
3. Thick Expand Widget Templates
4. Find this code : </body>
5. Copy the code below, and paste above </body>


6. Find this code : <p class='comment-footer'>                          
                            <b:if cond='data:post.embedCommentForm'>

7. Copy the code below, and paste under <p class='comment-footer'>


<b><img border='0' src='http://us.i1.yimg.com/us.yimg.com/i/mesg/emoticons7/21.gif'/> 
:))
<img border='0' src='http://us.i1.yimg.com/us.yimg.com/i/mesg/emoticons7/100.gif'/> 
:)]
<img border='0' src='http://us.i1.yimg.com/us.yimg.com/i/mesg/emoticons7/71.gif'/> 
;))
<img border='0' src='http://us.i1.yimg.com/us.yimg.com/i/mesg/emoticons7/5.gif'/> 
;;)
<img border='0' src='http://us.i1.yimg.com/us.yimg.com/i/mesg/emoticons7/4.gif'/> 
:D
<img border='0' src='http://us.i1.yimg.com/us.yimg.com/i/mesg/emoticons7/3.gif'/> 
;)
<img border='0' src='http://us.i1.yimg.com/us.yimg.com/i/mesg/emoticons7/10.gif'/> 
:p
<img border='0' src='http://us.i1.yimg.com/us.yimg.com/i/mesg/emoticons7/20.gif'/> 
:((
<img border='0' src='http://us.i1.yimg.com/us.yimg.com/i/mesg/emoticons7/1.gif'/> 
:)
<img border='0' src='http://us.i1.yimg.com/us.yimg.com/i/mesg/emoticons7/2.gif'/> 
:(
<img border='0' src='http://us.i1.yimg.com/us.yimg.com/i/mesg/emoticons7/8.gif'/> 
:X
<img border='0' src='http://us.i1.yimg.com/us.yimg.com/i/mesg/emoticons7/12.gif'/> 
=((
<img border='0' src='http://us.i1.yimg.com/us.yimg.com/i/mesg/emoticons7/13.gif'/> 
:-o
<img border='0' src='http://us.i1.yimg.com/us.yimg.com/i/mesg/emoticons7/7.gif'/> 
:-/
<img border='0' src='http://us.i1.yimg.com/us.yimg.com/i/mesg/emoticons7/11.gif'/> 
:-*
<img border='0' src='http://us.i1.yimg.com/us.yimg.com/i/mesg/emoticons7/22.gif'/> 
:|
<img border='0' src='http://us.i1.yimg.com/us.yimg.com/i/mesg/emoticons7/35.gif'/> 
8-}
<img border='0' src='http://us.i1.yimg.com/us.yimg.com/i/mesg/emoticons7/102.gif'/> 
~x(
<img border='0' src='http://us.i1.yimg.com/us.yimg.com/i/mesg/emoticons7/104.gif'/> 
:-t
<img border='0' src='http://us.i1.yimg.com/us.yimg.com/i/mesg/emoticons7/66.gif'/> 
b-(
<img border='0' src='http://us.i1.yimg.com/us.yimg.com/i/mesg/emoticons7/62.gif'/> 
:-L
<img border='0' src='http://us.i1.yimg.com/us.yimg.com/i/mesg/emoticons7/14.gif'/> 
x(
<img border='0' src='http://us.i1.yimg.com/us.yimg.com/i/mesg/emoticons7/24.gif'/> 
=))</b>


8. Save it